BUTTM - Manual
About
BUTTM (Broadcast Using This Tool Modernized) is a modern broadcasting application inspired by BUTT, the well-known broadcasting client. It keeps a simple connect-and-go workflow while packing in the tools you need for professional live radio and podcasting.
Connect up to two audio devices and stream to multiple Icecast and Shoutcast compatible servers at the same time. Go live from your inputs, run shows from the built-in dual-deck player with library, soundboard, and playlists, or mix both on air. Shape your sound with a 10-band EQ, compressor, and limiter. Automate start and stop times with the scheduler. Record your broadcast and control BUTTM over the network or via MIDI. With BUTTM Link, you can even pull audio from another BUTTM installation on your LAN or internet.
Available for Windows and macOS. Support for Linux may be added in the future.
Features
Besides the basic features you would expect from broadcasting software, BUTTM adds the following capabilities:
- Streaming to multiple servers simultaneously
- Audio effects such as a 10-band EQ, a compressor and a limiter
- Scheduler to automatically start and stop broadcasts
- Support for two audio devices with auto ducking
- Audio monitor to preview your signal
- Notifications for selected events by email or URL calls
- Control through network and MIDI
- Recording
- Built-in Audio Player with two decks, a soundboard, an audio library and a show list
- BUTTM Link to receive audio from a remote BUTTM installation over the network
- Many additional features
Install
Go to the official download page and download BUTTM for your preferred operating system. Then follow the installation instructions for Windows or macOS below.
Windows
After downloading the application, open your Downloads folder and double-click BUTTM-setup.exe.
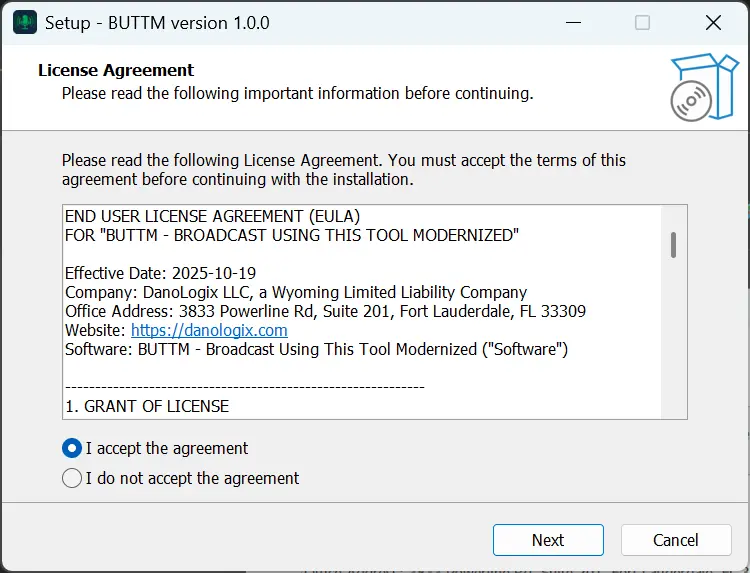
Then follow the instructions in the setup wizard to complete the installation.
macOS
After downloading the application, open your Downloads folder and double-click BUTTM.dmg. Drag the BUTTM.app icon to the Applications folder as shown below. This copies BUTTM to your Applications folder. When the copy is complete, open the Applications folder and start BUTTM.app.
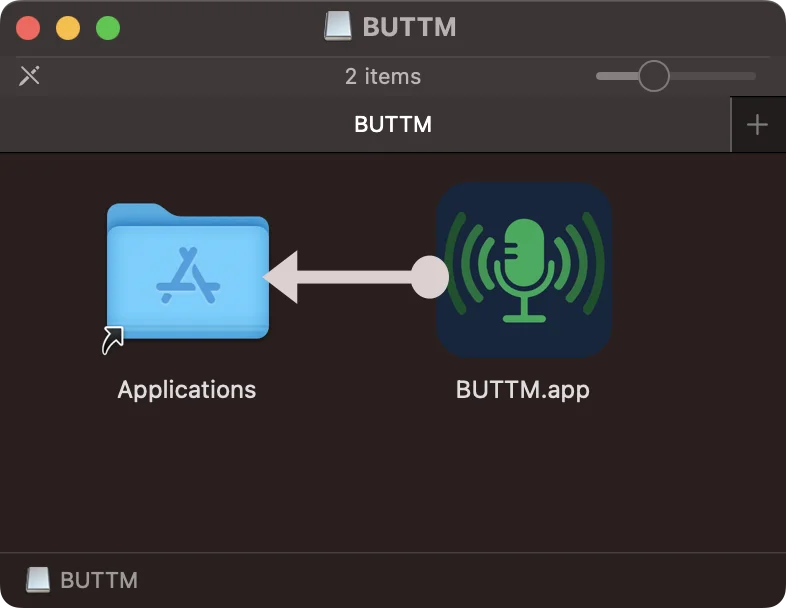
Install on macOS
Main Window
The main window of BUTTM is the central place for controlling your broadcasting setup. It gives you direct access to all Stations and shows their current state.
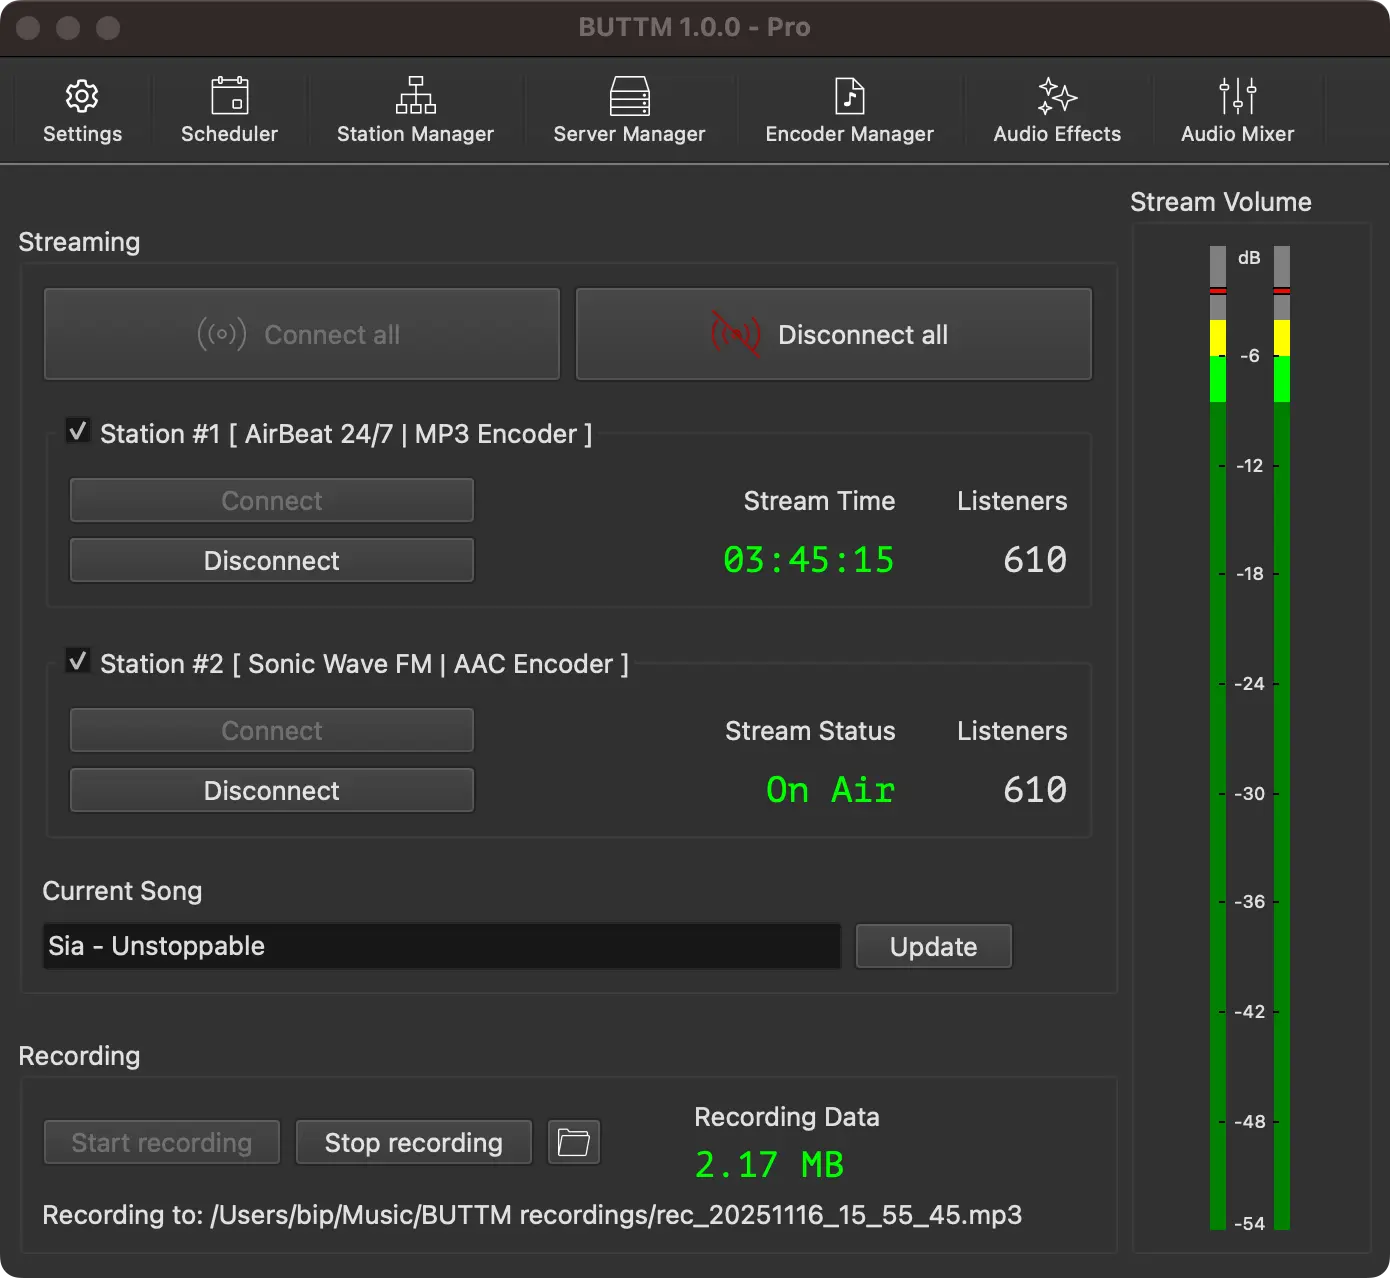
Main Window
Toolbar
At the top of the main window you find the Toolbar. It provides quick access to the most important functions like Settings, Audio Player, Effects and the Mixer.
Streaming Section
The Streaming area below the toolbar is the central part of the window. Here you can control your stations and monitor their current state. Click Connect All to connect all enabled stations. Click Disconnect All to disconnect all stations.
You can enable or disable individual stations by clicking the checkbox in the upper left corner of each station. Disabled stations are ignored when using the Connect All button.
Tip
Click on the Stream Info text to cycle through the available information: Stream Time, Stream Status and Stream Data.
The listeners section shows the number of active listeners. If no listeners are displayed, your stream hoster does not provide this information to BUTTM. Go to Settings → Stream to enable or disable listener stats.
Current Song
Below your stations you can manually update the current song. To update the current song automatically from specific sources, see the Song Update section.
Recording Section
At the bottom you find the Recording area. Here you can start and stop recording and monitor the recording state.
Click the folder icon to open your recording directory.
Tip
Click the Recording Info text to cycle through the available information: Recording Time, Recording Status and Recording Data.
Tip
You can start and stop recording at any time by pressing Ctrl+R on Windows or Cmd+R on macOS.
VU-meter
The VU-meter on the right helps you keep your audio levels in range. It shows both the current peak and RMS levels. The lighter bar shows the peak level and the darker bar shows the RMS level.
To avoid clipping, make sure the peak indicator never reaches the top (0 dBm). The built-in Limiter can help you with this.
When Show short-term LUFS is enabled in Settings → Audio → VU-Meter, a short-term LUFS reading appears at the top of the meter. This gives you a perceptual loudness reference in addition to the dBFS level meter.
Getting started
When launching BUTTM for the first time, a license window appears that informs you that the application is running in Trial mode. In Trial mode all features are available, but the audio signal is interrupted every five minutes by a voice that says "BUTTM Trial, please purchase the software". This allows you to test every feature before deciding to purchase it.
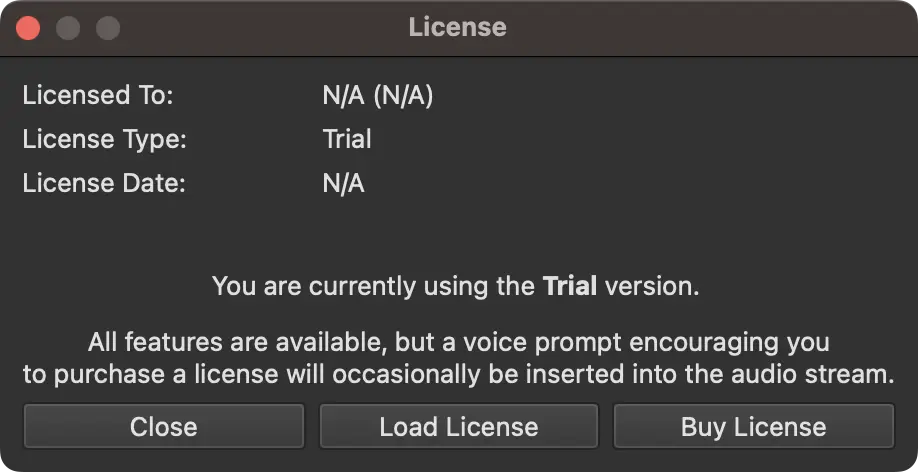
License Window
The license window presents three options:
Close to start using BUTTM in Trial mode.
Load License to load a license you already purchased.
Buy License to purchase a new license.
You can open the license window again at any time by selecting File → License.
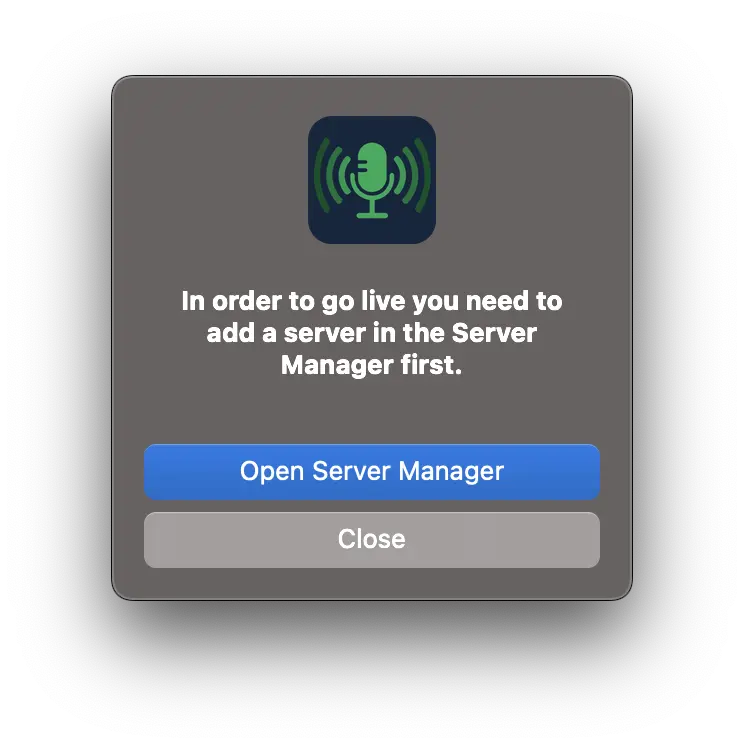
After closing the license window, a message box appears and advises you to add your first server in the Server Manager.
You can add a server immediately or do it later by clicking the Server Manager button.
After adding a server it is automatically assigned to the default Station #1. By default an MP3 encoder with 128 kbps is assigned to Station #1. To assign a different encoder to Station #1, open the Station Manager. To modify the settings of an encoder, open the Encoder Manager. BUTTM includes five predefined encoders, one for each codec (MP3, AAC, Opus, Vorbis, FLAC and WAV). You can add additional encoders if needed. For example, you can create another MP3 encoder with a lower bit rate and use it with a different Station.
By default BUTTM uses the system's default audio interface for broadcasting. If you need to select a different audio device, click the Settings button in the main window toolbar and open the Audio settings.

Start broadcasting
You are now ready to go live. Click Connect all or use the Connect button of an individual Station.
Tip
If BUTTM does not start correctly and you suspect a damaged configuration, hold down the Shift key while launching the application.
BUTTM will then ask whether you want to start with a new configuration file.

Running Multiple Instances
BUTTM supports running more than one instance at the same time, each with its own configuration and library.
Each instance requires its own isolated folder that contains a complete set of configuration files. The easiest way to create such a folder is the Create Instance Directory wizard available under the File menu.
The wizard copies your current configuration into a folder you choose and places a ready-to-use launcher next to the folder:
- On Windows the launcher is a
.batfile. - On macOS the launcher is a self-contained
.appbundle.
Double-click the launcher to start the new instance. It uses the configuration files in its own folder and runs completely independently of any other BUTTM instance.
You can also start BUTTM from the command line with the -d flag to point it at an existing instance directory:
buttm -d /path/to/instance-folder
Tip
When multiple instances are running at the same time, each one uses a different network control port to avoid conflicts. BUTTM automatically picks the next available port when the preferred port is already in use and reports the actual port it bound to.
Managers
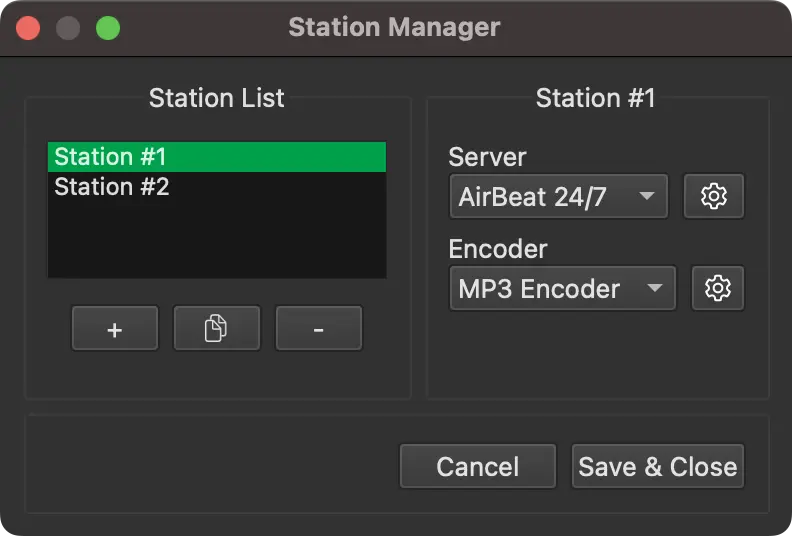
The Managers in BUTTM provide a flexible way to organize your setup. The Server Manager lets you manage all of your broadcasting servers. The Encoder Manager allows you to configure different audio encoders for broadcasting and recording. The Station Manager lets you manage your stations. A station is the element that appears on the main screen and is used to start or stop a broadcast. Each station consists of one server and one encoder.
Station Manager
A station represents the unit that controls your broadcast. Every station is shown in the [main window] and provides buttons to connect to or disconnect from the server. It also displays the current state and the number of active listeners, if this information is available.
Station Manager
The Station List shows all available stations. Select the station you want to edit. To add, copy or delete the selected station, click the +, copy or - button. To rename a station, double-click its entry in the Station List. For each station you must select the server and encoder it should use.
The image below shows how the Stations appear on the main window.
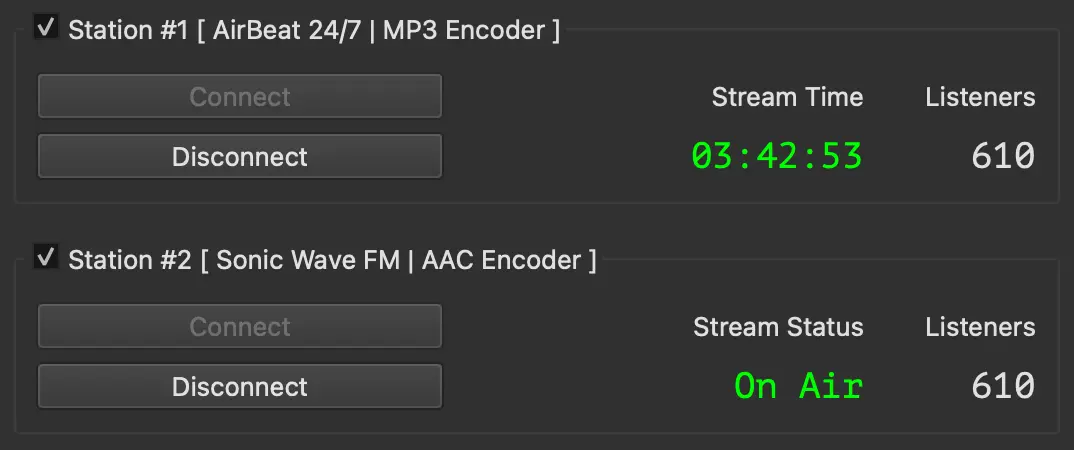
Stations on the main window
Server Manager
In the Server Manager you configure the servers that are used by a station. Keeping servers and stations separate allows you to set up many servers while using only a few stations or even a single station. This gives you flexibility when needed.
BUTTM supports Icecast and Shoutcast compatible servers, as well as BUTTM Link for sending audio to another BUTTM installation. Icecast support includes Icecast 2.3, 2.4, 2.5, Icecast-kh and liquidsoap. Shoutcast support includes Shoutcast v1 and Shoutcast v2. Shoutcast v2 servers work only if support for legacy clients is enabled in the server configuration, which is true for most default setups.
As in the Station Manager, you can add, copy or delete a server in the Server List by clicking the +, copy or - buttons. You can rename a server by double-clicking its name in the list.
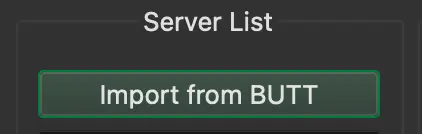
If you are a user of the older broadcasting software BUTT, an Import from BUTT button appears above the Server List.
It lets you import your existing BUTT server entries with a single click.
Icecast
To add a new Icecast server, click the + button and give it a custom name. Then make sure that Icecast is selected as the Server Type.
Icecast Settings
Fill in the required fields under Server Information. You usually receive this information from your hosting provider.
If you run your own server, you can find the required details in your server configuration files.
Below is a description of each field.
Address:
The IP address or hostname of the server. Do not include http:// or https://.
Port:
The server port. It must be a number between 1 and 65535.
Username:
The user name for your server.
Password:
The password that belongs to the user name. Click on Show to reveal your password.
Note
Make sure you do not confuse your stream hoster’s web login credentials with your source client credentials.
They are not the same. If you are unsure which credentials to use, please contact your stream hoster.
Mountpoint:
Icecast allows streaming to different endpoints called mount points. A mount point normally begins with a leading slash, but you can omit it. BUTTM adds the slash automatically.
Use legacy Icecast protocol:
When enabled, BUTTM connects using the older SOURCE protocol instead of PUT. Turning it on can sometimes resolve connection issues.
Use inline ICY metadata:
When enabled, BUTTM inserts song metadata directly into the audio stream using the StreamTitle ICY metadata field for MP3 and AAC codecs, instead of using the legacy HTTP side-channel update method.
Note
Inline ICY metadata is supported only for MP3 and AAC.
For OGG-based codecs such as Opus, Vorbis and FLAC, the song title is written into the OGG header and, for maximum compatibility, also updated using the legacy HTTP side-channel method.
Enable encryption (SSL/TLS):
Enable this option if you want to use encryption and the server supports it.
Warning
Encryption with Icecast 2.4.x is not recommended. After ending a broadcast, the connection is not closed correctly by the server. As a result, BUTTM cannot reconnect unless you restart the server or wait a long time. Switching to Icecast 2.5.x or Icecast-kh is recommended.
Custom Listeners URL:
Enter a custom URL for listener stats (see info text below)
Custom Listeners Mountpoint:
Enter a custom mountpoint for listener stats (see info text below)
Info
BUTTM derives the URL for listener statistics from the server settings. This usually works only with plain Icecast or Shoutcast servers.
If you are using a stream hoster, the setup is often more complex and listener statistics may be available on a different mountpoint or URL.
In such cases you can specify a custom mountpoint or URL that BUTTM should use instead.
For example, if you stream to the mountpoint /stream but the listener statistics are available at /live, enter /live in the Custom listeners mountpoint field in the server settings.
If you are unsure which URL or mountpoint to use, please contact your stream hoster.
The ICY Metadata fields are optional. If your station is publicly listed, you should fill them in.
If you want the station name or genre to appear in media players, enter the information here.
After entering all required details, click Test Connection to check whether a connection to the server can be established.
Shoutcast
To add a new Shoutcast server, click the + button and give it a custom name. Then make sure that Shoutcast is selected as the Server Type.
Shoutcast Settings
Fill in the required fields under Server Information. You usually receive this information from your hosting provider.
If you run your own server, you can find the required details in your server configuration files.
Below is a description of each field.
Address:
The IP address or hostname of the server. Do not include http:// or https://.
Port:
The server port. It must be a number between 1 and 65535.
Password:
The password that belongs to the user name. Click on Show to reveal your password.
DJ / User ID (optional):
This field is usually not required but can be used when connecting to Shoutcast v2 servers.
Stream ID (optional):
This field is usually not required but can be used when connecting to Shoutcast v2 servers.
Note
Make sure you do not confuse your stream hoster’s web login credentials with your source client credentials.
They are not the same. If you are unsure which credentials to use, please contact your stream hoster.
Custom Listeners URL:
Enter a custom URL for listener stats (see info text below)
Info
BUTTM derives the URL for listener statistics from the server settings. This usually works only with plain Icecast or Shoutcast servers. If you are using a stream hoster, the setup is often more complex and listener statistics may be available on a different URL. In such cases you can specify a custom URL that BUTTM should use instead.
The ICY Metadata fields are optional. If your station is publicly listed, you should fill them in.
If you want the station name or genre to appear in media players, enter the information here.
After entering all required details, click Test Connection to check whether a connection to the server can be established.
If you are satisfied with the configuration, click Save & Close and then select the new server for one of your stations in the Station Manager.
BUTTM Link
BUTTM Link is a server type for sending audio from this installation to another BUTTM over the network or internet. The receiving BUTTM must have Enable Server turned on in Settings → BUTTM Link. The incoming audio appears there as the BUTTM Link channel in the Mixer.
To add a BUTTM Link destination, click the + button in the Server List and give it a custom name. Then select BUTTM Link as the Server Type.
BUTTM Link Settings
Fill in the fields under Server Information using the values from the receiving BUTTM’s BUTTM Link settings. Below is a description of each field.
Address:
The IP address or hostname of the machine running the receiving BUTTM. Do not include http:// or https://. On a local network this is often a private address such as 192.168.x.x. When connecting over the internet, use the public IP or hostname of the remote machine and ensure the port is reachable through any firewall or router.
Port:
The port the receiving BUTTM listens on for BUTTM Link connections. This must match the port shown in the receiver’s settings. The default is 9000.
Password:
The password configured on the receiving BUTTM. It must match exactly. Click Show to reveal the password you enter here.
After entering all required details, click Test Connection to check whether a connection to the remote BUTTM Link server can be established.
If you are satisfied with the configuration, click Save & Close and then select the new server for one of your stations in the Station Manager. When that station is connected, this installation sends its encoded output to the remote BUTTM Link server.
Encoder Manager
In the Encoder Manager you configure the encoders (codecs) that are used by a station or for recording. Keeping encoders and stations separate allows you to set up many encoders while using only a few stations or even a single station. This gives you flexibility when needed.
BUTTM supports MP3, AAC/AAC+, Opus, Vorbis and FLAC. Additionally WAV is supported for recordings.
As in the Station Manager, you can add, copy or delete an encoder in the Encoder List by clicking the +, copy or - buttons. You can rename an encoder by double-clicking its name in the list.
BUTTM includes four encoder presets, one for each codec. If you delete or change a preset by accident, you can restore all four presets by clicking the Restore Defaults button.
Encoder Manager
BUTTM supports a wide range of parameters for each codec. If you are not familiar with these settings, the default values should work well in most situations. In case you want to learn more about the parameters, please refer to the original codec documentation.
If you are satisfied with the configuration, click Save & Close and then select the new encoder for one of your stations in the Station Manager.
Scheduler Manager
The Scheduler Manger lets you add schedulers to automatically start or stop broadcasts, recordings and Audio Player shows at specific times.

Scheduler Manager
To add a scheduled event, select the action you want to perform and set the time at which it should run. The following actions are available:
Start streaming:
Connects all enabled stations or the stations you select from the list.
Stop streaming:
Disconnects all connected stations or the stations you select.
Start recording:
Starts a recording at the scheduled time.
Stop recording:
Stops the current recording.
Start Show:
Starts the Audio Player show at the scheduled time. You can choose to use the default show list that was last active when the player was closed, or load a specific show file saved on disk. Optionally you can also start streaming at the same time by enabling Start streaming in the action settings.
Stop Show:
Stops the currently running Audio Player show. Optionally you can also stop streaming at the same time by enabling Stop streaming in the action settings.
Audio Mixer
The Mixer provides an overview of all audio channels and their current levels. Each channel is shown as a vertical strip with a level meter, a gain fader, and a numeric gain display. When many channels are visible at the same time, a horizontal scrollbar appears below the channel strips so you can scroll to channels that are off-screen.

Audio Mixer
Input 1 and Input 2 display the live audio coming from the corresponding input sources. These controls allow you to balance the input volumes before they are sent to Stream and Recording signal paths. To mute one of the input channels press the M button or map your MIDI controller to this button. Press the Headphone icon to route the channel to your monitor device.
Audio Player shows the signal coming from the built-in Audio Player. Its gain fader, mute button and monitor button work the same way as the input channels.
BUTTM Link shows the signal received from a connected BUTTM Link client. It is only visible when BUTTM Link is enabled in Settings.
The Mixer provides separate output channels for different destinations:
Streaming:
Controls the signal level that is sent to the streaming output. The fader affects the streaming path only.
Recording:
Controls the level used for recordings. Adjusting this fader affects the recording path only.
Monitor:
Controls the volume used for monitoring. This adjustment applies only to your local monitor output.
Master Gain:
Applies gain adjustment to the Streaming, Recording and Monitor signals.
Crossfader:
The Crossfader blends Input 1 and Input 2. The left side corresponds to Input 1, the right side to Input 2.
LUFS Labels
When Show short-term LUFS is enabled in Settings → Audio → VU-Meter, a short-term LUFS reading appears above each channel strip in the Mixer. The same reading is also shown at the top of the VU meter in the main window. See VU-Meter for an overview of LUFS and how BUTTM uses it.
Tip
Double click any slider to reset it to its default position.
Audio Effects
This section provides tools to adjust and refine the sound of your audio. The effects help you shape the signal in a practical way and make it easier to achieve a clear and balanced result.
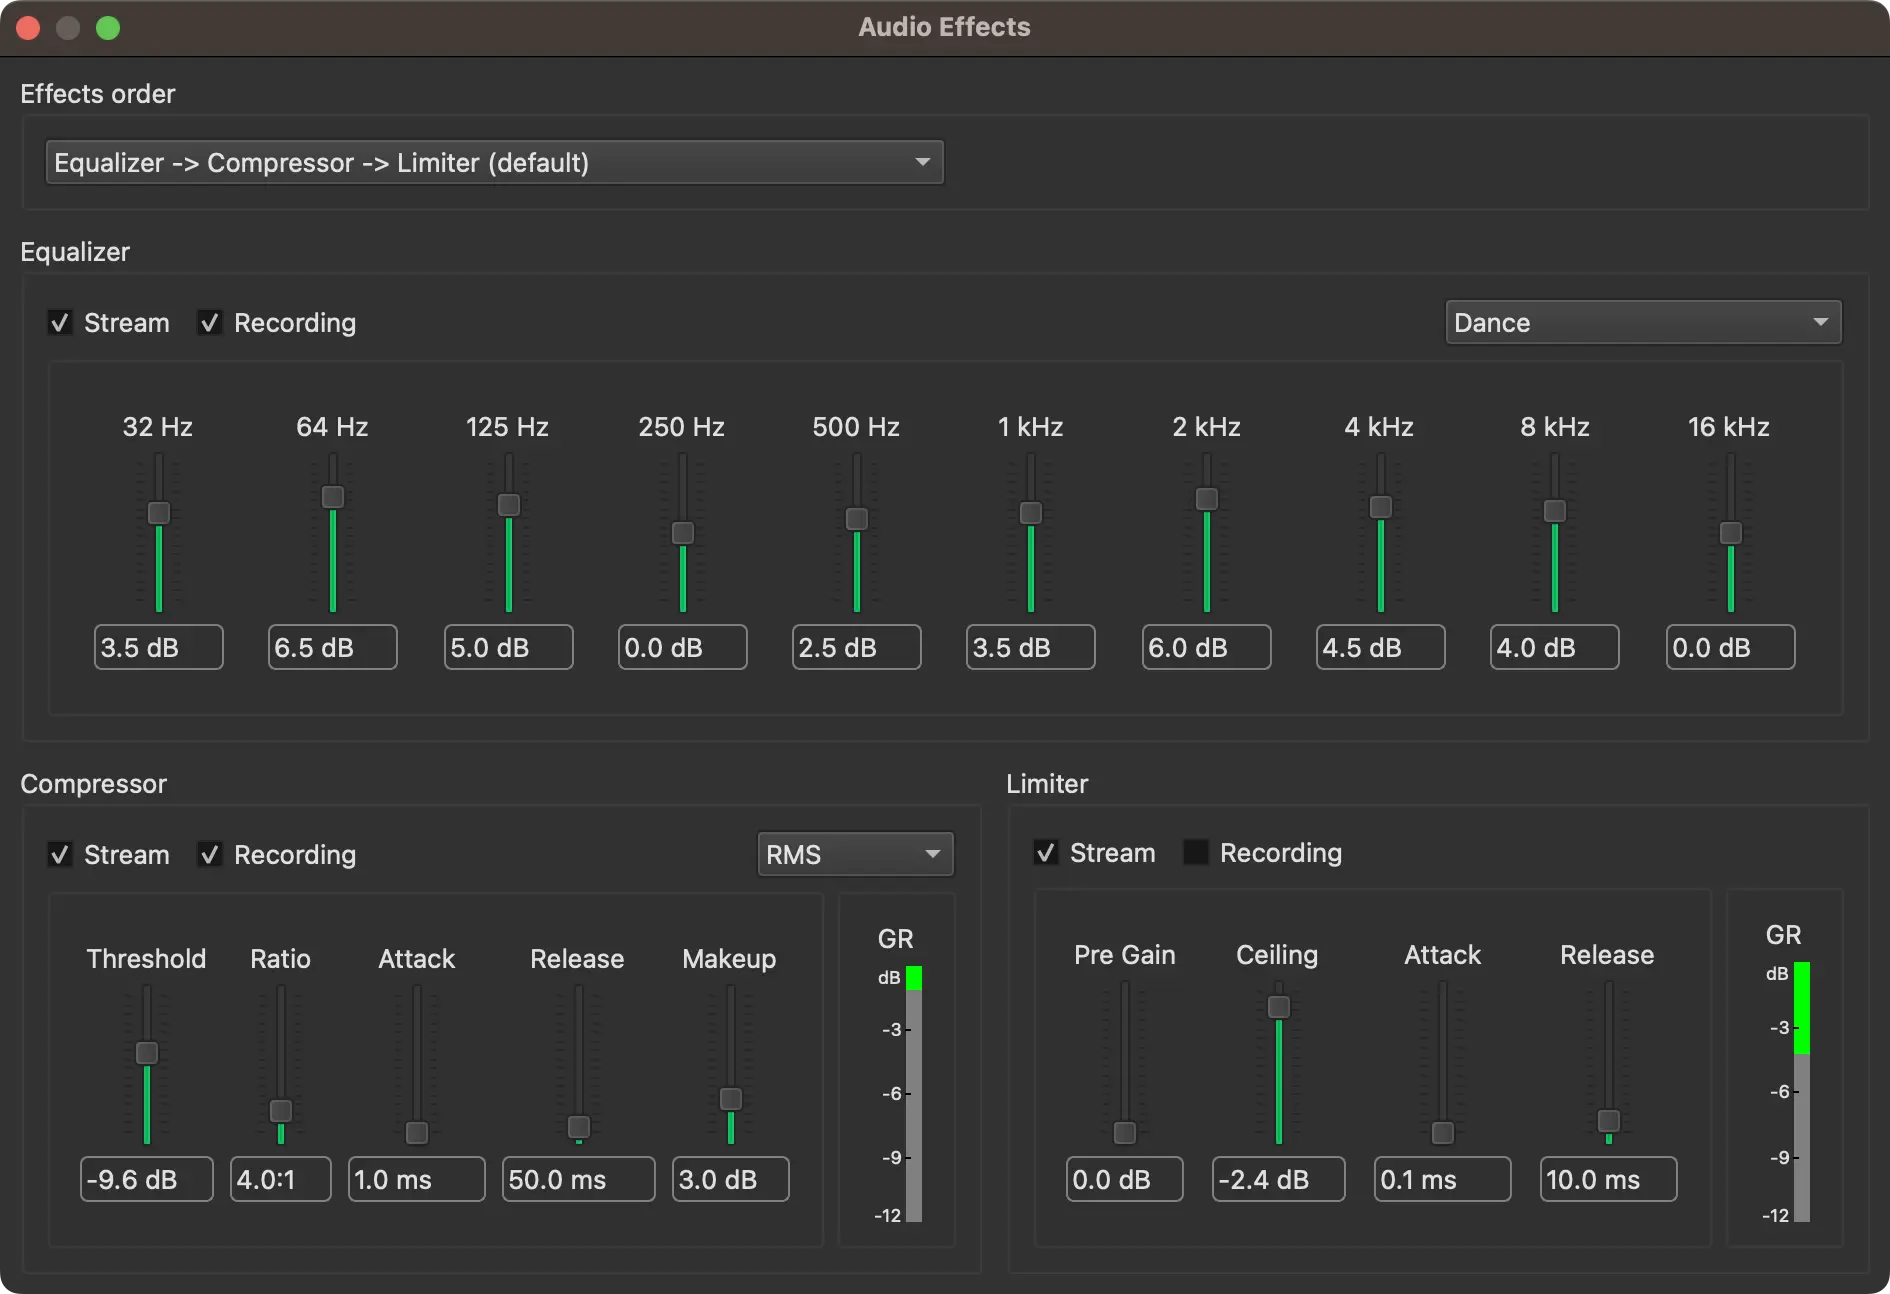
Audio Effects
Effects order:
Here you can choose how the effects are chained together. The default order is Equalizer → Compressor → Limiter, which is the most common setup.
If you prefer a different order, for example placing the Compressor after the Limiter, you can select that as well. Any other permutation is also possible.
Each effect can be enabled or disabled individually by selecting or clearing its checkbox.
By default, effects are inserted after the mixer, which combines the signals from input device 1 and input device 2.
If you prefer to process only input device 1 or input device 2, you can change this by selecting a different option in the Routing drop-down menu.
An effect can be routed in five different ways:
Device 1+2 → Stream + Recording:
The effect is inserted after the mixer and affects both the Stream and Recording signals.
Device 1+2 → Stream:
The effect is inserted after the mixer and affects only the Stream signal.
Device 1+2 → Recording:
The effect is inserted after the mixer and affects only the Recording signal.
Device 1 → Stream + Recording:
The effect is inserted to the Input Device 1 signal before the mixer and affects both the Stream and Recording signals.
Device 2 → Stream + Recording:
The effect is inserted to the Input Device 2 signal before the mixer and affects both the Stream and Recording signals.
Tip
To restore the default settings of an effect, click the circular arrow icon on the right side of the effect.
Equalizer
The 10-band equalizer (EQ) lets you fine-tune the tonal balance of your audio by boosting or reducing specific frequency ranges. Each band represents a part of the audible spectrum, from low bass to high treble. Adjusting these bands allows you to correct tonal issues, highlight certain frequencies or shape the audio to better fit your material or preference.
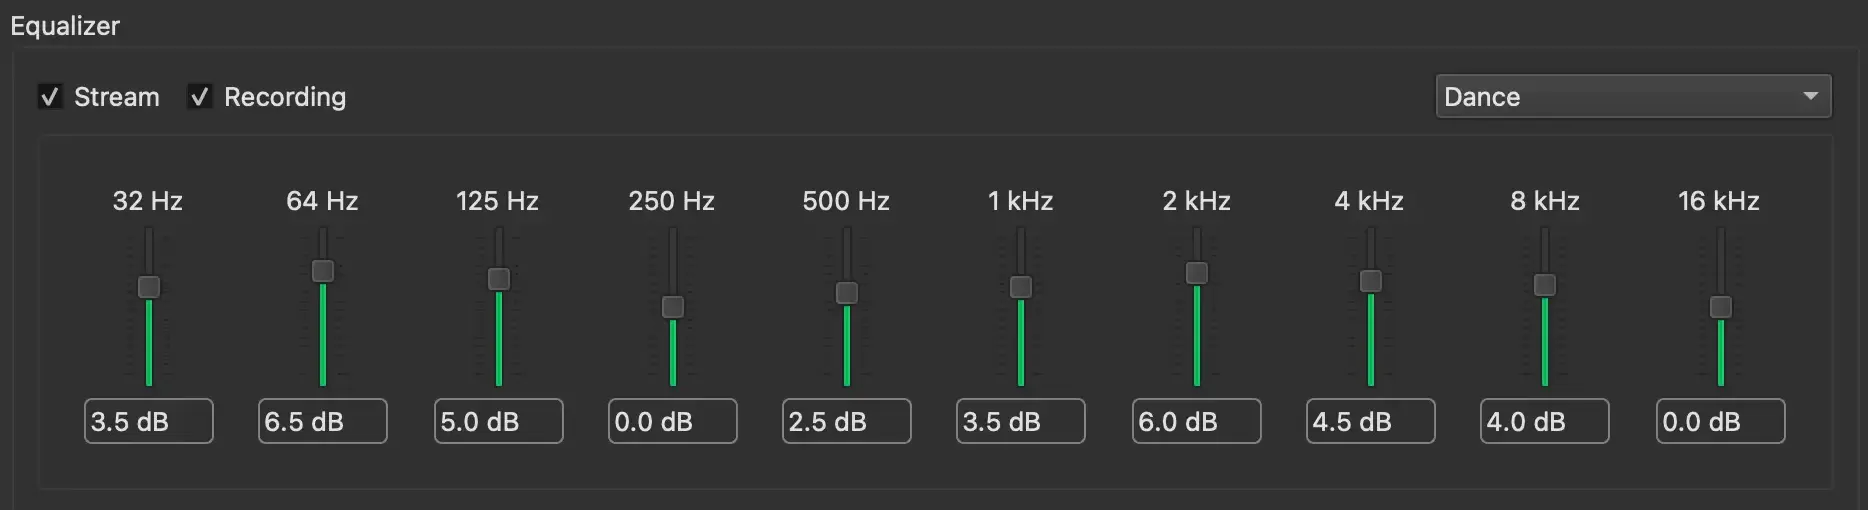
Effects: 10-band Equalizer
Each band can be set from −12 dB to +12 dB:
- Positive values increase the selected frequency range and make it more prominent.
- Negative values reduce the selected range and soften frequencies that are too dominant.
For quick results, the application includes a range of presets designed for different styles and listening preferences. These presets provide ready-made EQ curves that can be used as they are or as a starting point for your own adjustments.
Compressor
Dynamic range compression reduces the difference between loud and quiet parts of the audio, giving listeners a more consistent experience. It is used by nearly all professional radio stations.
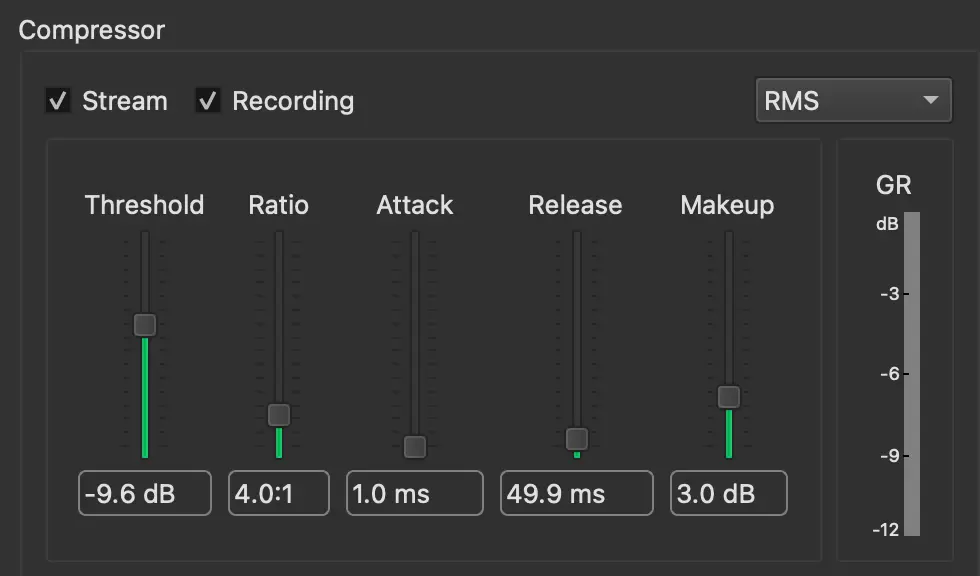
Effects: Compressor
To determine whether the signal exceeds the threshold, a compressor usually measures the signal level over time and compares it to the threshold. BUTTM provides two measurement modes - RMS and Peak.
RMS:
The signal level is averaged over a short period. This introduces a slight delay, but the result is smoother and more natural.
Peak:
The compressor reacts immediately to individual samples without averaging. This makes it respond faster and sound more aggressive.
Threshold:
Sets the input level at which compression begins. Signals louder than this value are reduced in level.
Ratio:
Defines the strength of the compression applied once the signal passes the threshold. Higher values result in heavier dynamic reduction.
Attack:
Controls how quickly the compressor reacts after the signal exceeds the threshold. Short times clamp peaks fast, longer times allow initial transients through.
Release:
Determines how fast the compressor stops reducing gain after the signal falls back below the threshold. Shorter times restore level quickly, longer times sound smoother.
Makeup:
Boosts the output level to compensate for gain reduction introduced during compression, helping match or increase loudness after processing.
The GR (Gain Reduction) meter shows how much the compressor is currently compressing the signal level.
A value of −3 dB means the compressor is compressing the signal by 3 dB. The lower the negative value, the stronger the compression.
The compressor uses the same settings for both the Stream and Recording signal paths.
Be aware that different Stream and Recording output levels can lead to different compressor behavior.
For example, if the Recording output level is set higher than the Stream level, the compressor on the Recording path will receive a louder signal and therefore apply more compression.
The GR meter always shows gain reduction (compression) for the signal path where the compressor is active:
- If the compressor is enabled for Stream, or for both Stream and Recording, the meter shows the Stream gain reduction.
- If the compressor is enabled only for Recording, the meter shows the Recording gain reduction.
A recommended procedure for configuring the compressor is:
- Play the loudest audio source you plan to broadcast (often music) and set it up using the master gain slider.
- Enable the compressor and adjust the threshold and ratio. The attack and release settings can usually remain unchanged unless you have a specific requirement. You will notice that the overall level decreases as the compressor reduces peaks.
- Adjust the makeup gain to bring the output back to its previous loudness.
- Test with a quieter source (for example your voice). It should now be louder relative to the music.
If it is still too quiet, reset the makeup gain to 0 and repeat from step 2.
Finding the optimal settings can take some time and depends on careful listening as much as on meters.
Once configured, BUTTM saves your settings so you usually only need to do this once.
As general guidance:
- Music should be compressed subtly, with a relatively high threshold and a ratio between 2:1 and 3:1.
- Speech can be compressed much more strongly, with a low threshold and a ratio of 5:1 or higher. This makes speech easier to understand and reduces level differences between speakers or inconsistent microphone distances.
- For mixed music and speech, configure BUTTM's compressor for music and use an additional compressor (often a hardware device) before the microphones in the audio chain.
Limiter
The limiter in BUTTM ensures that your output signal never exceeds a defined maximum level. This prevents clipping, distortion, and unexpected volume spikes, especially useful for livestreaming or broadcasting where consistent loudness and protection against overloads are critical. Because BUTTM uses a look-ahead limiter, peaks are detected slightly before they reach the output stage, allowing the limiter to react cleanly and transparently even to very sudden transients. This makes the limiter ideal as the final stage in your signal chain, ensuring stable, broadcast-safe output levels at all times.
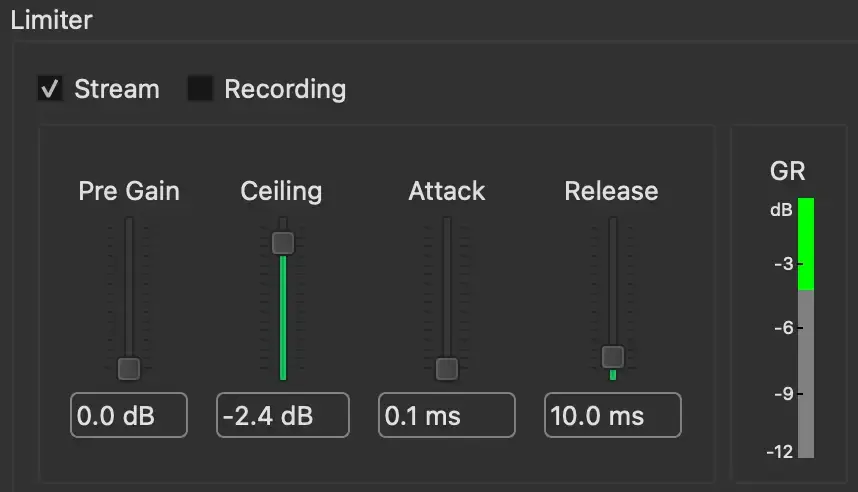
Effects: Limiter
Pre Gain:
Sets the input gain feeding into the limiter. Increasing this value drives the signal harder, resulting in more frequent or stronger limiting. Useful for increasing loudness before final peak control.
Ceiling:
Defines the maximum output level the limiter will allow. BUTTM prevents the signal from ever exceeding this value, making it the primary safety threshold for distortion-free output.
Attack:
Controls how quickly limiting starts when the signal approaches the ceiling. Lower values catch sharp transients immediately, while slightly longer times retain more natural transient detail.
Release:
Sets how fast the limiter recovers once the signal falls back below the ceiling. Short settings restore volume quickly, longer settings sound smoother and help avoid pumping.
The GR (Gain Reduction) meter shows how much the limiter attenuates the signal level currently.
A value of −3 dB means the limiter is attenuating the signal by 3 dB. The lower the negative value, the stronger the attenuation.
The limiter uses the same settings for both the Stream and Recording signal paths.
Be aware that different Stream and Recording output levels can lead to different limiter behavior.
For example, if the Recording output level is set higher than the Stream level, the limiter on the Recording path will receive a louder signal and therefore apply more attenuation.
The GR meter always shows gain reduction (attenuation) for the signal path where the limiter is active:
- If the limiter is enabled for Stream, or for both Stream and Recording, the meter shows the Stream gain reduction.
- If the limiter is enabled only for Recording, the meter shows the Recording gain reduction.
VST3
VST3 plugins allow you to extend BUTTM with third-party audio processors. BUTTM hosts them in a plugin rack that can hold any number of plugins processed in series. The signal passes through each plugin from the top of the list to the bottom.

Effects: VST3
The Loaded Plugins table shows all plugins currently in the rack. Each row displays a checkbox (On) and the plugin's name and vendor.
To add a plugin, click + and select a .vst3 file. BUTTM opens the standard VST3 folder on your system automatically. You can also drag plugin files from Finder or Explorer directly onto the table. If the selected file is a shell plugin that contains multiple effects (for example WaveShell products), BUTTM shows a selection dialog so you can choose which sub-plugin to load.
To remove a plugin, select its row and click −.
To change the processing order, select a plugin and click Up or Down, or drag the row to a new position in the table.
Double-click a row or select it and click Show to open the plugin's graphical editor in a separate window. The button label changes to Hide while the editor is visible. Clicking it again hides the editor window without affecting audio processing.
Each plugin can be enabled or disabled individually using its On checkbox.
The Bypass all plugins checkbox bypasses the entire rack at once. A warning label appears next to the checkbox as a reminder when bypass is active.
When Remember Plugin Settings is enabled, BUTTM saves and restores the state of each loaded plugin individually. Click Manage... to view and delete previously saved states.
Info
If a built-in effect and the VST3 rack are assigned to the same routing position, the VST3 rack is always inserted after the built-in effect.
The Routing drop-down controls where in the signal chain the rack is inserted. The following options are available:
In 1+2+Player → Stream + Recording:
The vst3 rack is inserted after the mixer, processing the combined signal from both inputs, Audio Player and BUTTM-Link. Affects both the Stream and Recording signals. This is the default.
In 1+2+Player → Stream:
Same as above but affects only the Stream signal.
In 1+2+Player → Recording:
Same as above but affects only the Recording signal.
In 1 → Stream + Recording:
The rack is inserted before the mixer on the Input Device 1 signal and affects both the Stream and Recording signals.
In 2 → Stream + Recording:
The rack is inserted before the mixer on the Input Device 2 signal and affects both the Stream and Recording signals.
Player → Stream + Recording:
The rack is inserted before the mixer on the Audio Player signal and affects both the Stream and Recording signals.
Audio Player
The Audio Player is a built-in playback system designed for broadcast use. It lets you play music, jingles and audio clips directly from within BUTTM without relying on a separate application. The player feeds its audio into the regular signal chain, where it appears as a dedicated Audio Player channel in the Mixer.
Click the Audio Player button in the main window toolbar to open the player.
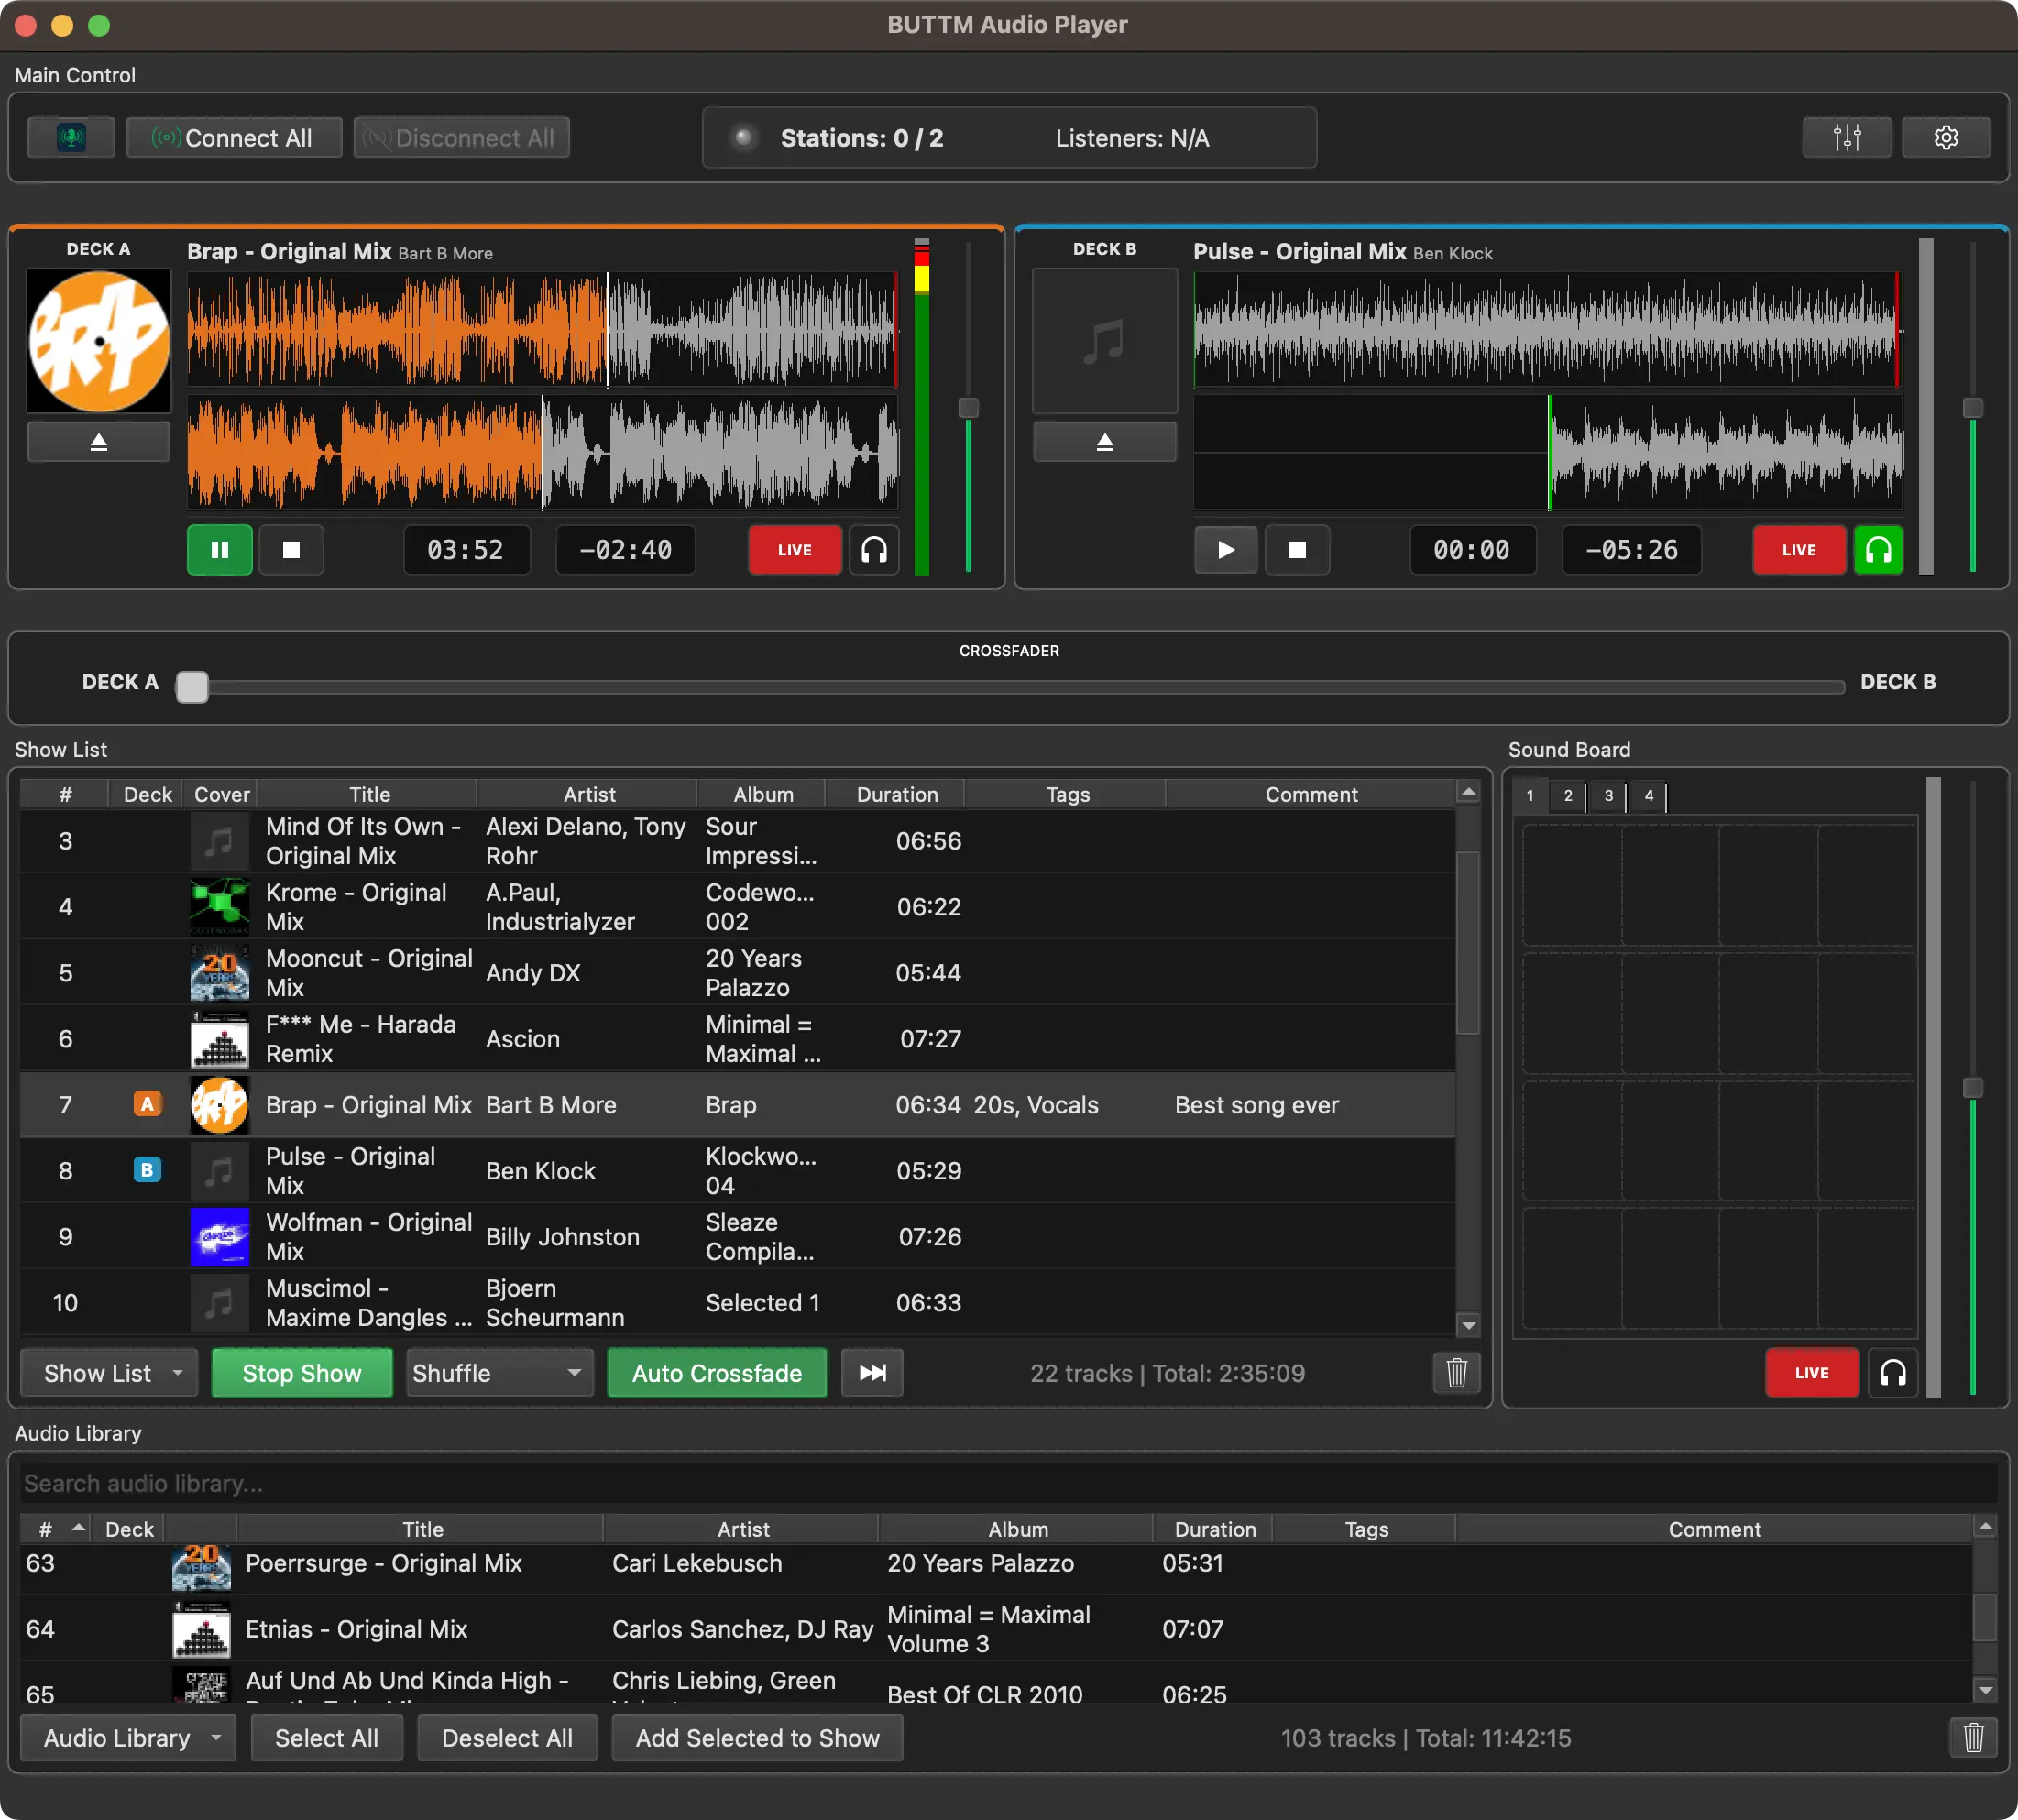
Audio Player
The player window consists of several independent panels called docks. Each dock can be moved, resized or floated as a separate window. To lock the current layout so docks cannot be accidentally repositioned, use the Layout menu and choose Lock Layout. To restore the original arrangement choose Reset Layout from the same menu.
Note
In order to hear music from the Audio Player directly on your computer you need to choose a monitor device in BUTTMs Audio settings and have monitoring enabled in either the Audio Player, Streaming or Recording audio channel using the Mixer.
Main Control
The Main Control dock inside the Audio Player window shows the state of all your stations at a glance, including the number of active listeners.

Audio Player: Main Control
It provides Connect All and Disconnect All buttons so you can start and stop your broadcast directly from the player without switching back to the main window.
The dock also provides quick-access buttons to open the Main Window, the Mixer, and the Player Settings.
Audio Library
The Audio Library is the central storage for all tracks you import into the player. Tracks are stored in a dedicated folder on your disk and tracked in a database, so the library remains intact even if you move the original source files afterward.
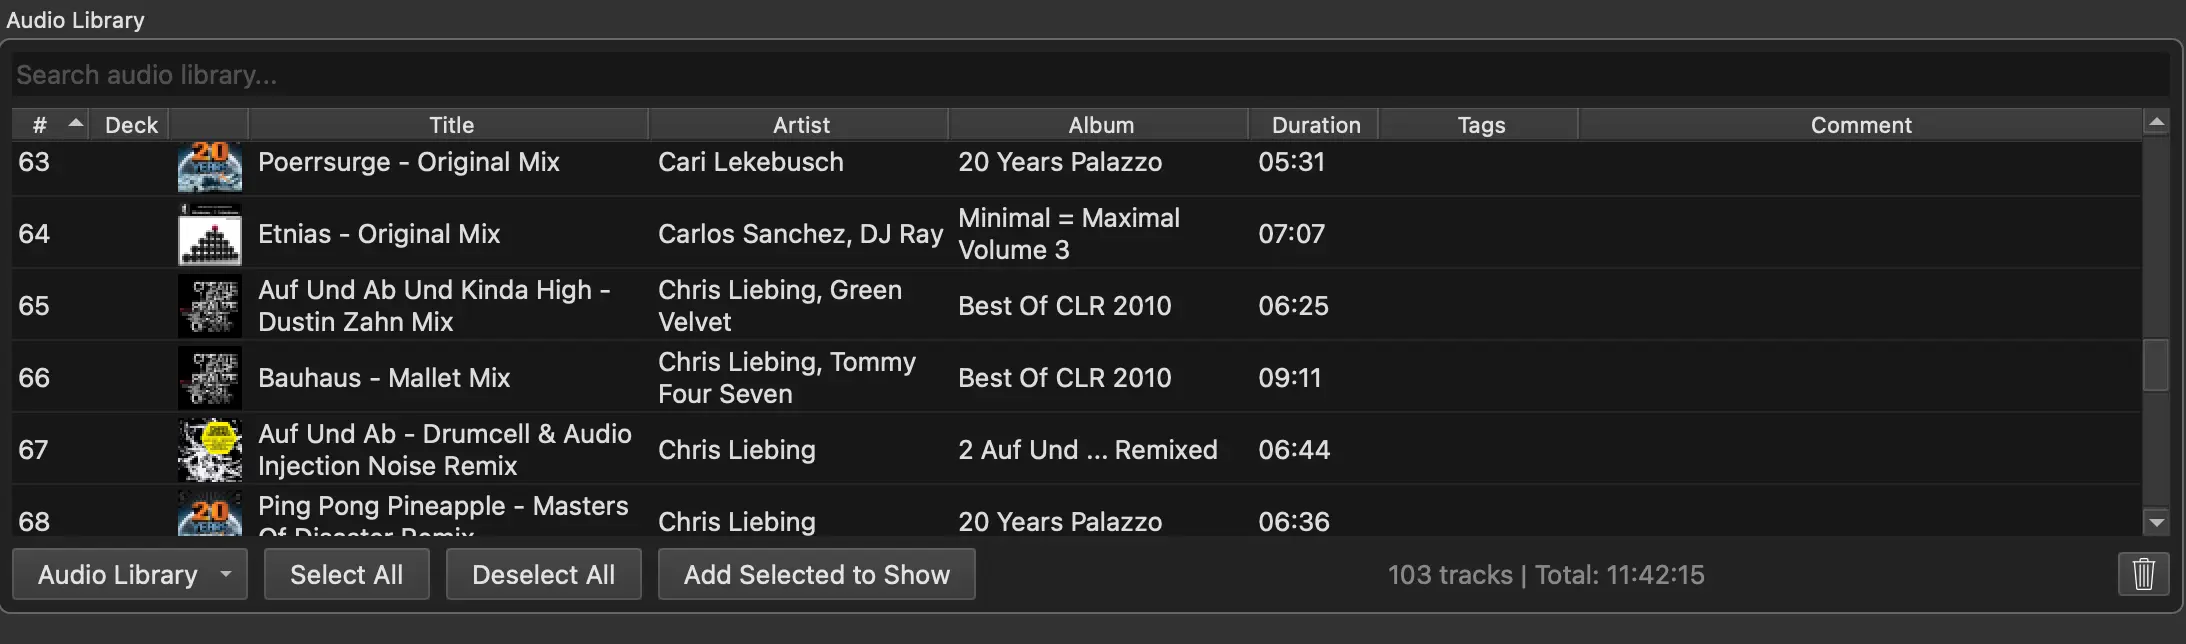
Audio Player: Audio Library
To add tracks to the library use the Audio Library menu button and choose one of the import options:
Import files:
Opens a file browser where you can select one or more audio files to import.
Import folder:
Imports all audio files found inside the selected folder, including subfolders.
After import, the tracks appear in the library table with their title, artist, album, duration and cover art. The library table can be sorted by any column by clicking its header. A filter field at the top narrows the list to tracks whose title or artist contains the typed text.
Tip
Hold Alt while double-clicking a track in the library or show list to open its Track Properties dialog.
To remove tracks from the library, select them and press the Delete or Backspace key, or right-click a track and choose Remove selected from the context menu.
Tip
Hover over a cell that is too narrow to show its full text to see the complete content in a tooltip.
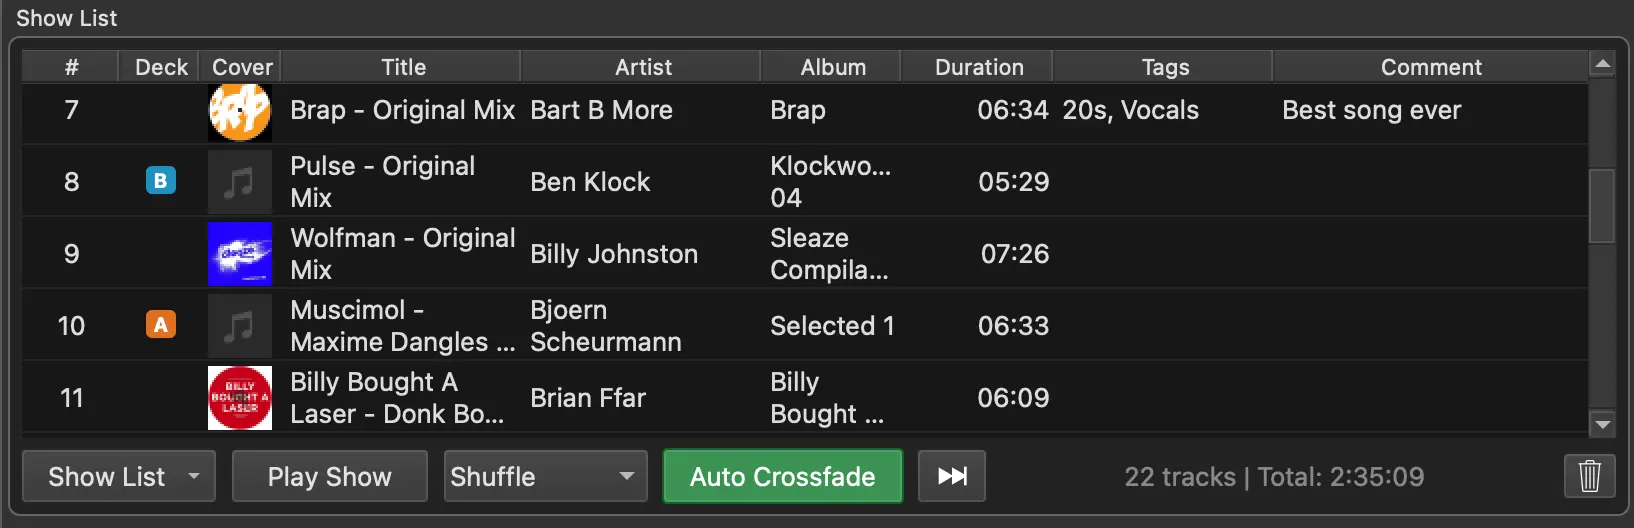
Show List
The Show List is a playlist that you prepare for a specific broadcast. You build it from tracks in the library and then start it as a sequence that plays automatically from one track to the next.
Audio Player: Show List
To add tracks to the show list, select one or more tracks in the library and click Add to Show, or drag them from the library table into the show list. You can reorder tracks in the show list by dragging rows up or down.
Playback order:
Choose Sequential to play tracks in the order they appear in the list, or Shuffle to play them in random order.
Auto crossfade:
When enabled, BUTTM automatically fades from the current deck to the next track on the standby deck as the playing track approaches its end. The crossfade duration is set in Settings → Audio Player.
Pause after track:
The Pause after track button in the show list toolbar pauses the running show automatically once the current track finishes, instead of advancing to the next track. This is useful when you need to step in at a defined point, for example to talk or play a soundboard clip before continuing the show.
The button only has an effect while a show is playing. Clicking it cycles through three states:
- Armed: The button turns orange and BUTTM shows Show will pause after the current track. When the current track ends, the show stops and does not crossfade to the next track. While armed, automatic crossfade is skipped even if Auto crossfade is enabled.
- Paused: After the track has ended, the button turns green and BUTTM shows Show paused after track. The show now waits for you to continue.
- Idle: Click the button once more to resume. BUTTM loads the next track onto the active deck and continues the show.
If you click the button while it is armed but before the track has ended, the pause is cancelled and the show continues normally.
To save the current show list to a file, open the show list menu and choose Save Show.... To load a previously saved show list choose Load Show.... BUTTM also saves the show list automatically when you close the player.
To start a show, click the Play Show button in the show list dock. BUTTM loads the first track onto the active deck and the second track onto the standby deck, then starts playback. When the current track ends, BUTTM automatically loads and plays the next one. Click Stop Show to stop the show.
To skip to the next track, click the Next button.
To remove a track from the show list, select it and press Delete or Backspace, or right-click and choose Remove from Show.
Decks
The two decks, Deck A and Deck B, are the main playback units of the Audio Player. Each deck can hold one audio file at a time and plays it independently.

Audio Player: Deck A and Deck B
Each deck shows the title and artist of the loaded track along with the cover art. The waveform display shows the full audio content as an overview and a zoomed view centered on the current position. The track's cue points are drawn as colored markers on the waveform.
The elapsed time and the remaining time are shown below the waveform. The remaining time turns red in the final ten seconds of the track to give you a visual warning.
Playback controls:
Play / Pause:
Starts or pauses playback of the loaded track.
Stop:
Stops playback and returns the position to the beginning of the track.
Eject:
Unloads the current track from the deck.
Prev cue / Next cue:
Jumps the playback position to the previous or next cue point. The info bar between the two buttons shows the name of the upcoming cue point and the time remaining until it is reached.
Volume:
Adjusts the output level of the deck. Double-click the slider to reset it to 0 dB.
LIVE:
Marks the deck as on air. When a deck is set to LIVE its signal is routed to the streaming and recording outputs.
Monitor (headphone icon):
Routes the deck output to the monitor so you can preview it in your headphones without sending it to the stream.
You can load a track onto a deck by dragging it from the library table or the show list directly onto the deck. During a running show, BUTTM handles deck loading automatically. Double-clicking a track in the library loads it onto the deck that is currently not playing.
Note
If both decks are playing, BUTTM will not interrupt either of them on a double-click. You receive a message in the status bar instead.
To seek to a position in the track, click or drag on the waveform. Dragging the zoomed waveform view also scrolls the position.
Click a deck's cover art while a track is loaded to open the Track Properties dialog for that track.
Soundboard
The Soundboard gives you instant access to short audio clips such as jingles, effects and station IDs. It is organized into four banks, each holding a 4×4 grid of pads, giving you 64 pads in total.
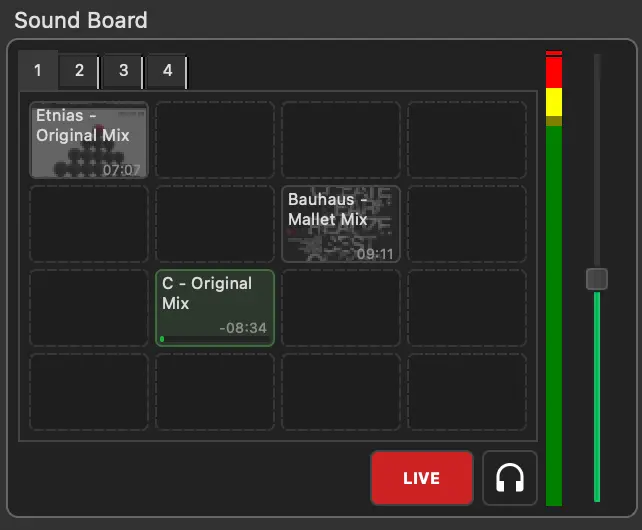
Audio Player: Soundboard
To assign a track to a pad, drag it from the library table onto the pad. Each pad shows the track title and, if cover art is available, a thumbnail. Click a pad to play the assigned clip. The pad that is currently playing is highlighted.
Only one soundboard pad can play at a time. Starting a new pad stops the currently playing one.
LIVE:
Marks the Soundboard as on air. When the Soundboard is set to LIVE its signal is routed to the streaming and recording outputs.
Monitor (headphone icon):
Works the same way as on the decks: routes the soundboard output to the monitor for headphone preview.
Volume:
Adjusts the output level of the soundboard. Double-click the slider to reset it to 0 dB.
To remove a track from a pad, right-click the pad and choose Clear Pad.
Crossfader
The Crossfader control lets you manually blend between Deck A and Deck B. Moving it fully to the left outputs Deck A at full volume with Deck B silent, and vice versa.
During an automatic show, the crossfader is driven by BUTTM itself when auto crossfade is active. You can still move it manually to override the automatic transition at any time.
Cue Points
Cue points are named, colored markers placed on a track's timeline. They are shown on the deck waveform and help you navigate a track quickly during a live show.
Every track has two cue points that can affect playback:
Start:
Marks where playback begins. When Start playback at Start cue point is enabled in Settings → Audio Player, the deck jumps here automatically instead of starting at 0:00.
End:
Marks where playback stops. When Stop playback at End cue point is enabled in Settings → Audio Player, the deck treats this position as the end of the track instead of the physical end of the file.
BUTTM detects the Start and End cue points automatically for every imported track, based on the silence detection threshold in Settings → Audio Player, but you can move or fine-tune them at any time.
You can also add four purely advisory markers - Intro Start, Intro End, Outro Start and Outro End - to bracket the talk-up and talk-over sections of a track. These do not affect playback. They only give you a visual and navigational reference. In addition, you can add any number of Custom cues with your own name, for example to mark a chorus or a specific line in a song.
All cue points are added and edited in the Track Properties → Cue Points tab.
Loudness Normalization
Loudness normalization helps tracks play at a consistent perceived volume, even when they were mastered at different levels. BUTTM uses the standardized EBU R128 integrated loudness measurement (LUFS) and the track's true-peak level (dBTP) to calculate an individual playback gain.
Normalization is non-destructive: BUTTM does not modify the audio file. The measured values are stored in the Audio Library database and a separate gain adjustment is applied during playback. The deck and Soundboard volume controls continue to work normally on top of this adjustment.
To use the feature, open Settings → Audio Player, enable Normalize playback loudness, and choose the Target loudness:
- -14 LUFS is a common target for music streaming services.
- -16 LUFS is a useful general-purpose target for mixed music and speech.
- -23 LUFS follows the EBU R128 broadcast target and leaves considerably more headroom.
When an unmeasured track is loaded onto a deck, BUTTM displays an analysis message in the player status bar and starts playback right away at unadjusted (unity) gain, so there is no dead air while the measurement runs. Once the analysis finishes a moment later, playback smoothly ramps to the correct normalized level. The result is stored and reused the next time the track is loaded.
Soundboard tracks are analyzed in the background when they are assigned to a pad, which keeps pad playback responsive. If a newly assigned pad is triggered before its analysis has finished, it plays immediately without normalization for that one playback; later triggers use the stored measurement.
This on-demand analysis happens whenever a track is loaded onto a deck or assigned to a pad, even while Normalize playback loudness is turned off. That way, if you turn the feature on later, tracks that have already passed through a deck or pad play at the correct normalized level immediately, with no analysis delay.
Instead of waiting for each track to be loaded, you can also measure every unmeasured track in the library up front. When you turn Normalize playback loudness on, BUTTM asks whether to analyze all tracks now or measure them as they are loaded. You can also start the analysis manually at any time from the Loudness Normalization settings. The analysis runs in the background and can be cancelled at any time.
Note
The true-peak protection applies to the normalization gain of each individual track. Raising a deck or Soundboard volume control, mixing several sources, or applying effects afterward can still increase the final output level. Use the Limiter when you need peak protection for the complete mix.
You can inspect a track's Integrated loudness and True-peak values under Track Properties → Loudness. Click Re-measure to analyze the track again.
Info
Integrated LUFS measures the complete track and is used for playback normalization. It is different from the optional short-term LUFS display on the VU meters, which continuously measures only the most recent few seconds of live audio.
Track Properties
Right-click any track in the library or the show list and choose Track Properties to open a dialog with detailed information about the track. You can also open it by clicking a deck's cover art, or by holding Alt while double-clicking a track in the library or show list.
The dialog has four tabs:
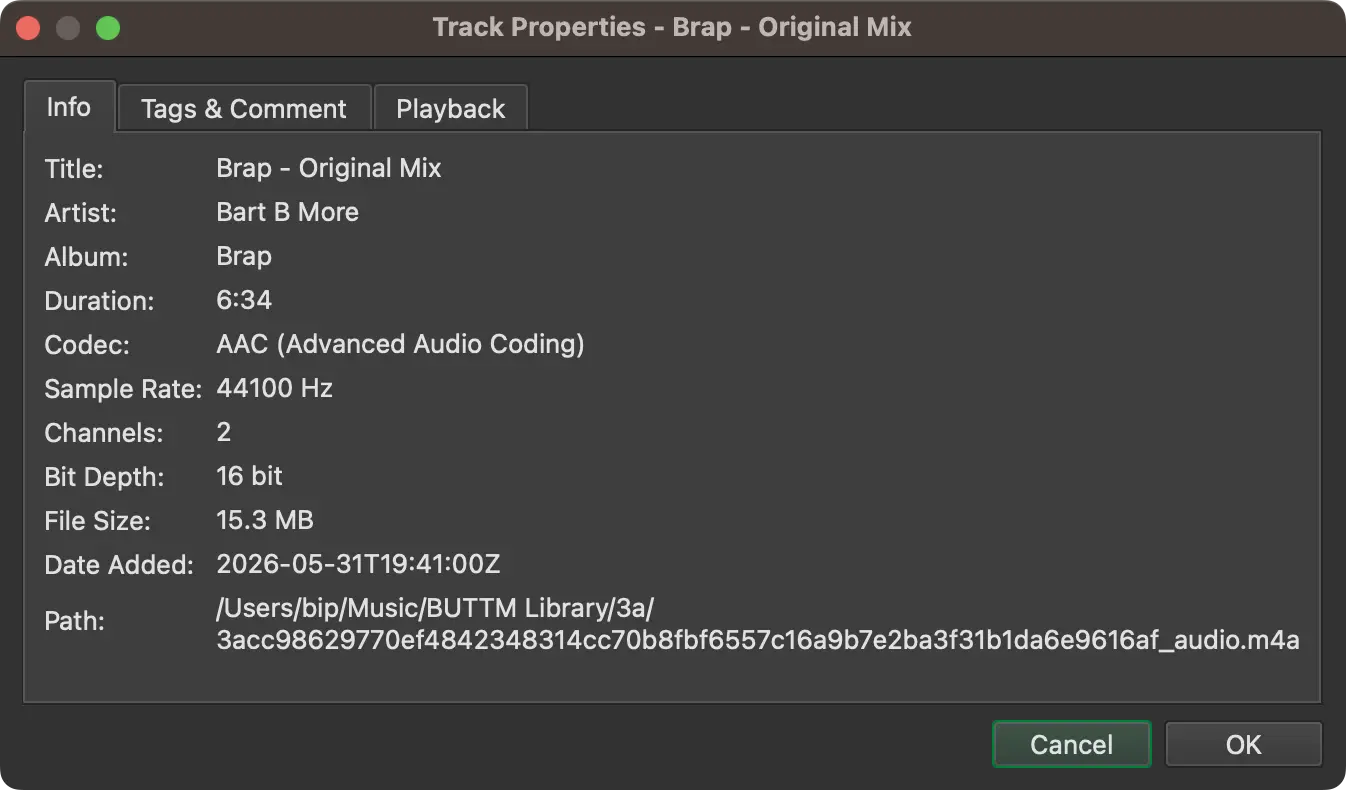
Info:
Audio Player: Track Properties - Info
Shows read-only metadata including codec, sample rate, channel count, bit depth, file size, the date the track was added to the library and the full file path.
Tags & Comment:
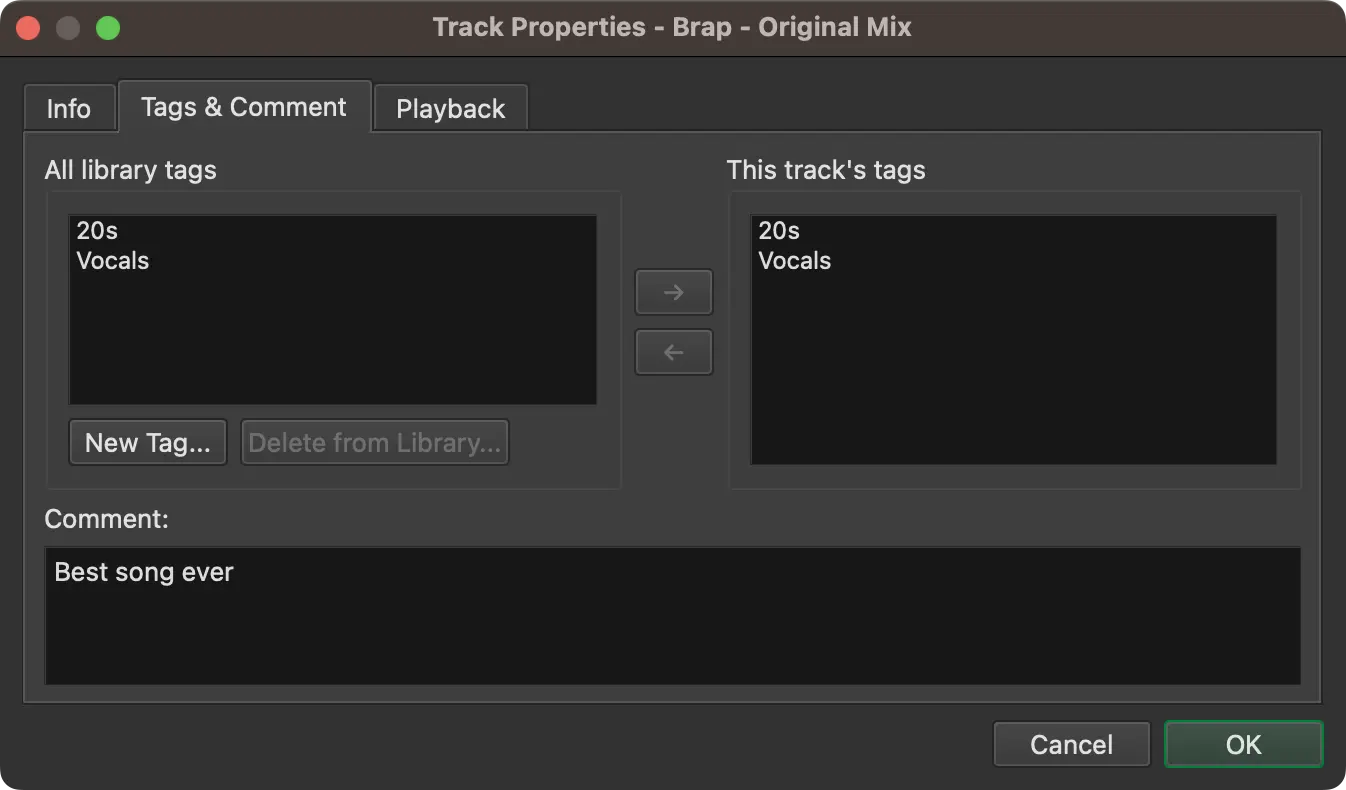
Audio Player: Track Properties - Tags & Comment
Lets you assign custom tags or comments to the track. Tags are labels you define yourself, for example "Music", "Jingle" or "Intro". You can add new tags to the global tag list, assign them to the track or remove them again. Tags are visible as colored labels in the library table.
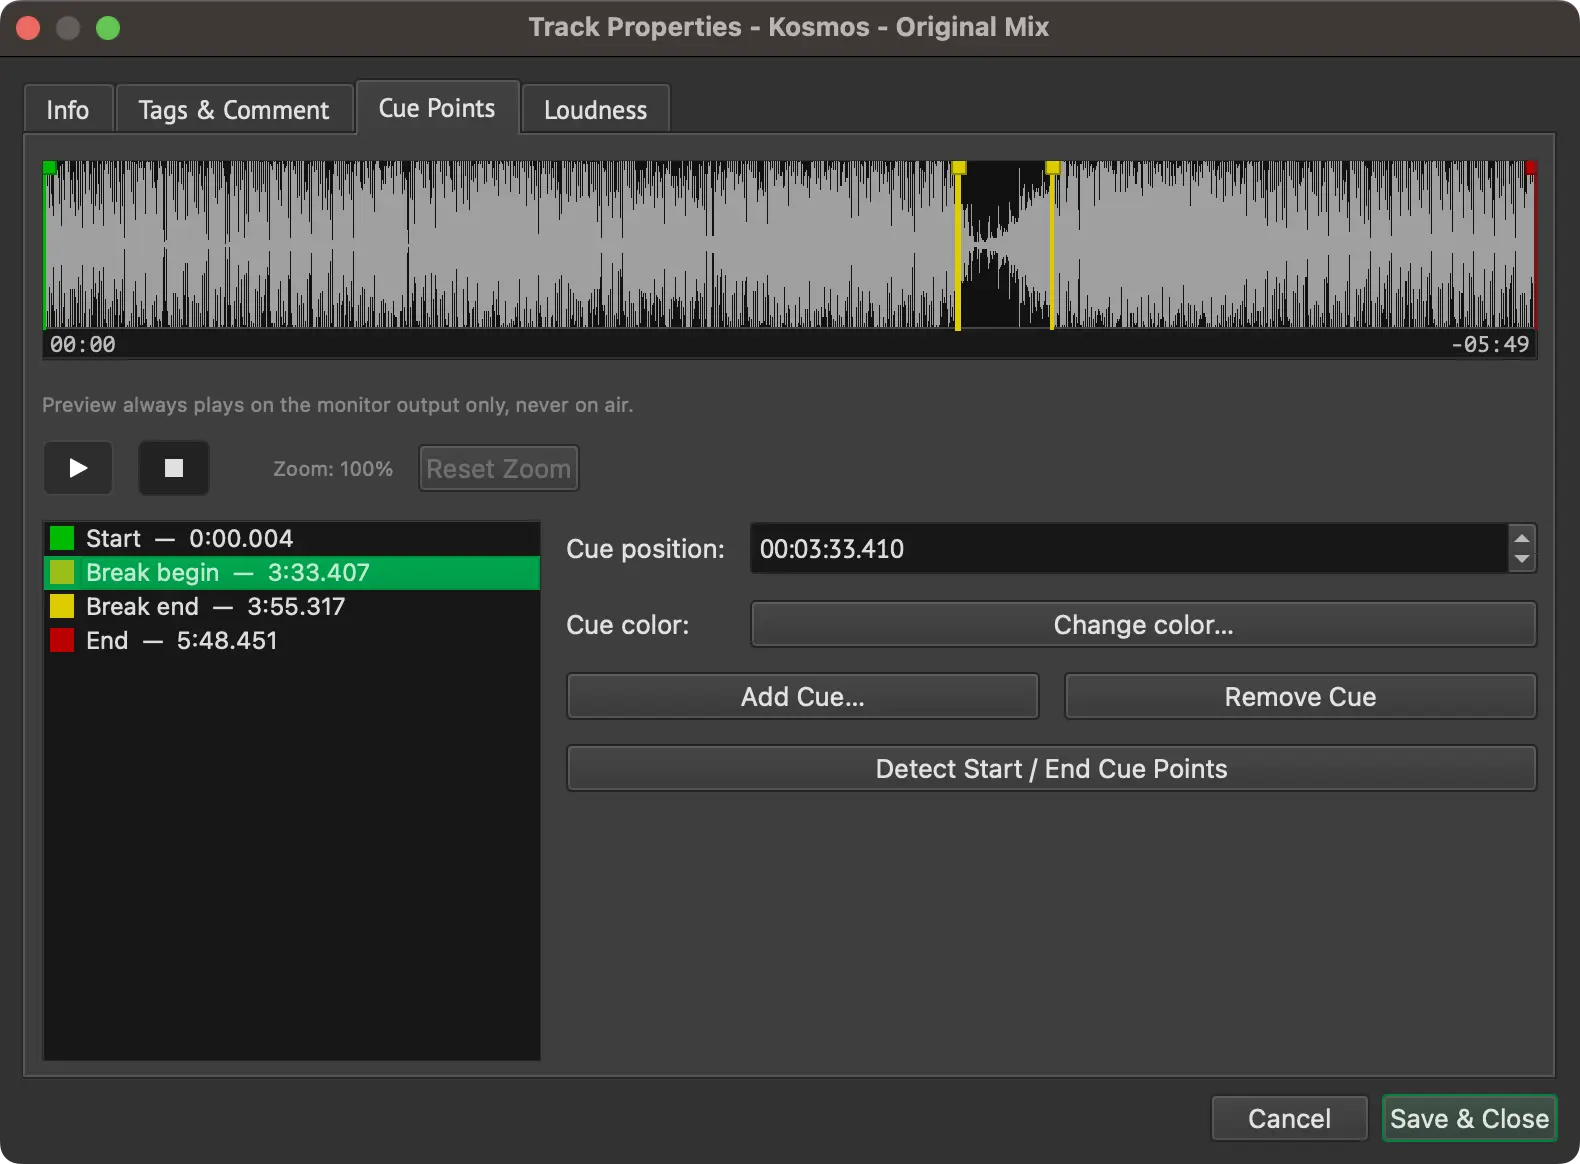
Cue Points:
Audio Player: Track Properties - Cue Points
Lets you view and edit all cue points of the track on a waveform. Select a cue point in the list to see and change its exact position and color, or drag its marker directly on the waveform. Use the scroll wheel over the waveform to zoom in and out around the cursor position, and drag to pan while zoomed in. Click Reset Zoom to return to the full track overview. Click Add Cue to add an Intro/Outro or Custom cue point, and Remove Cue to delete a Custom or advisory one. Click Detect Start / End Cue Points to re-run automatic silence detection for this track. A small transport below the waveform lets you preview the track through your monitor output while editing, without affecting the live broadcast.
Loudness:
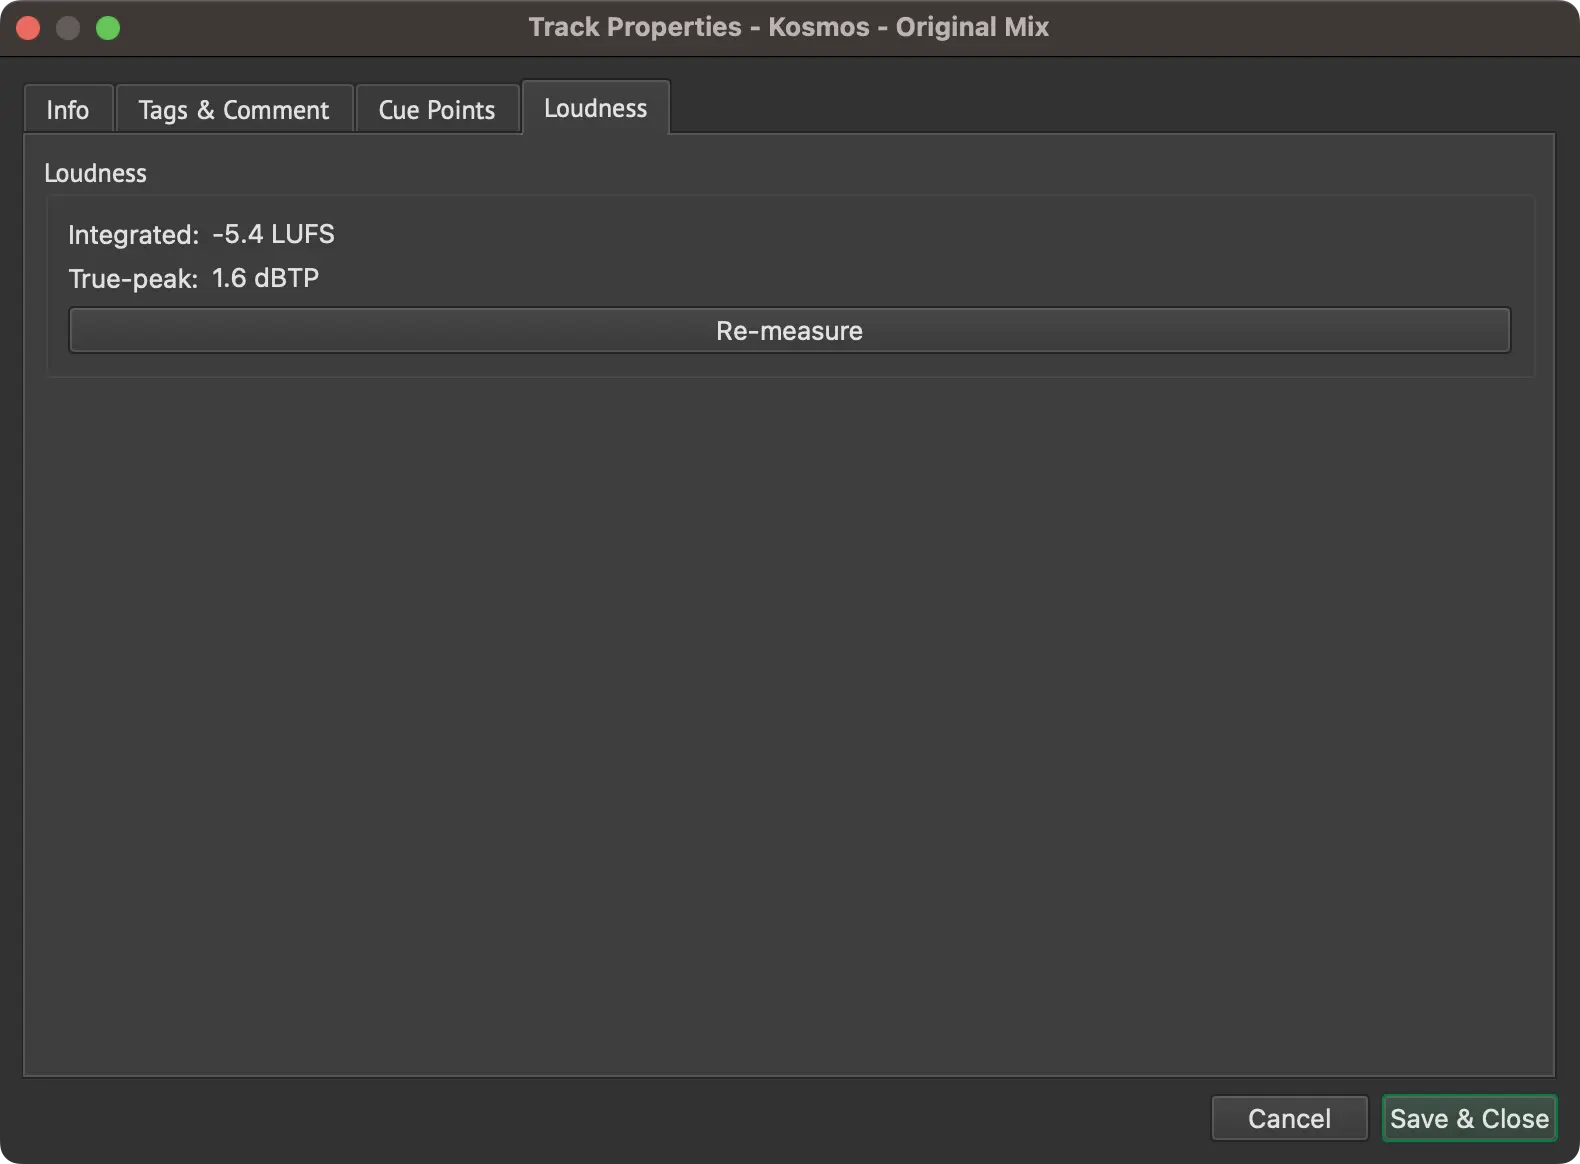
Audio Player: Track Properties - Loudness
Shows the track's integrated loudness in LUFS and its true-peak level in dBTP. These measurements are used by Loudness Normalization. Click Re-measure to update them manually.
Settings
BUTTM provides a wide range of settings that allow you to adapt the application to your needs. Below you find a detailed description of each settings page.
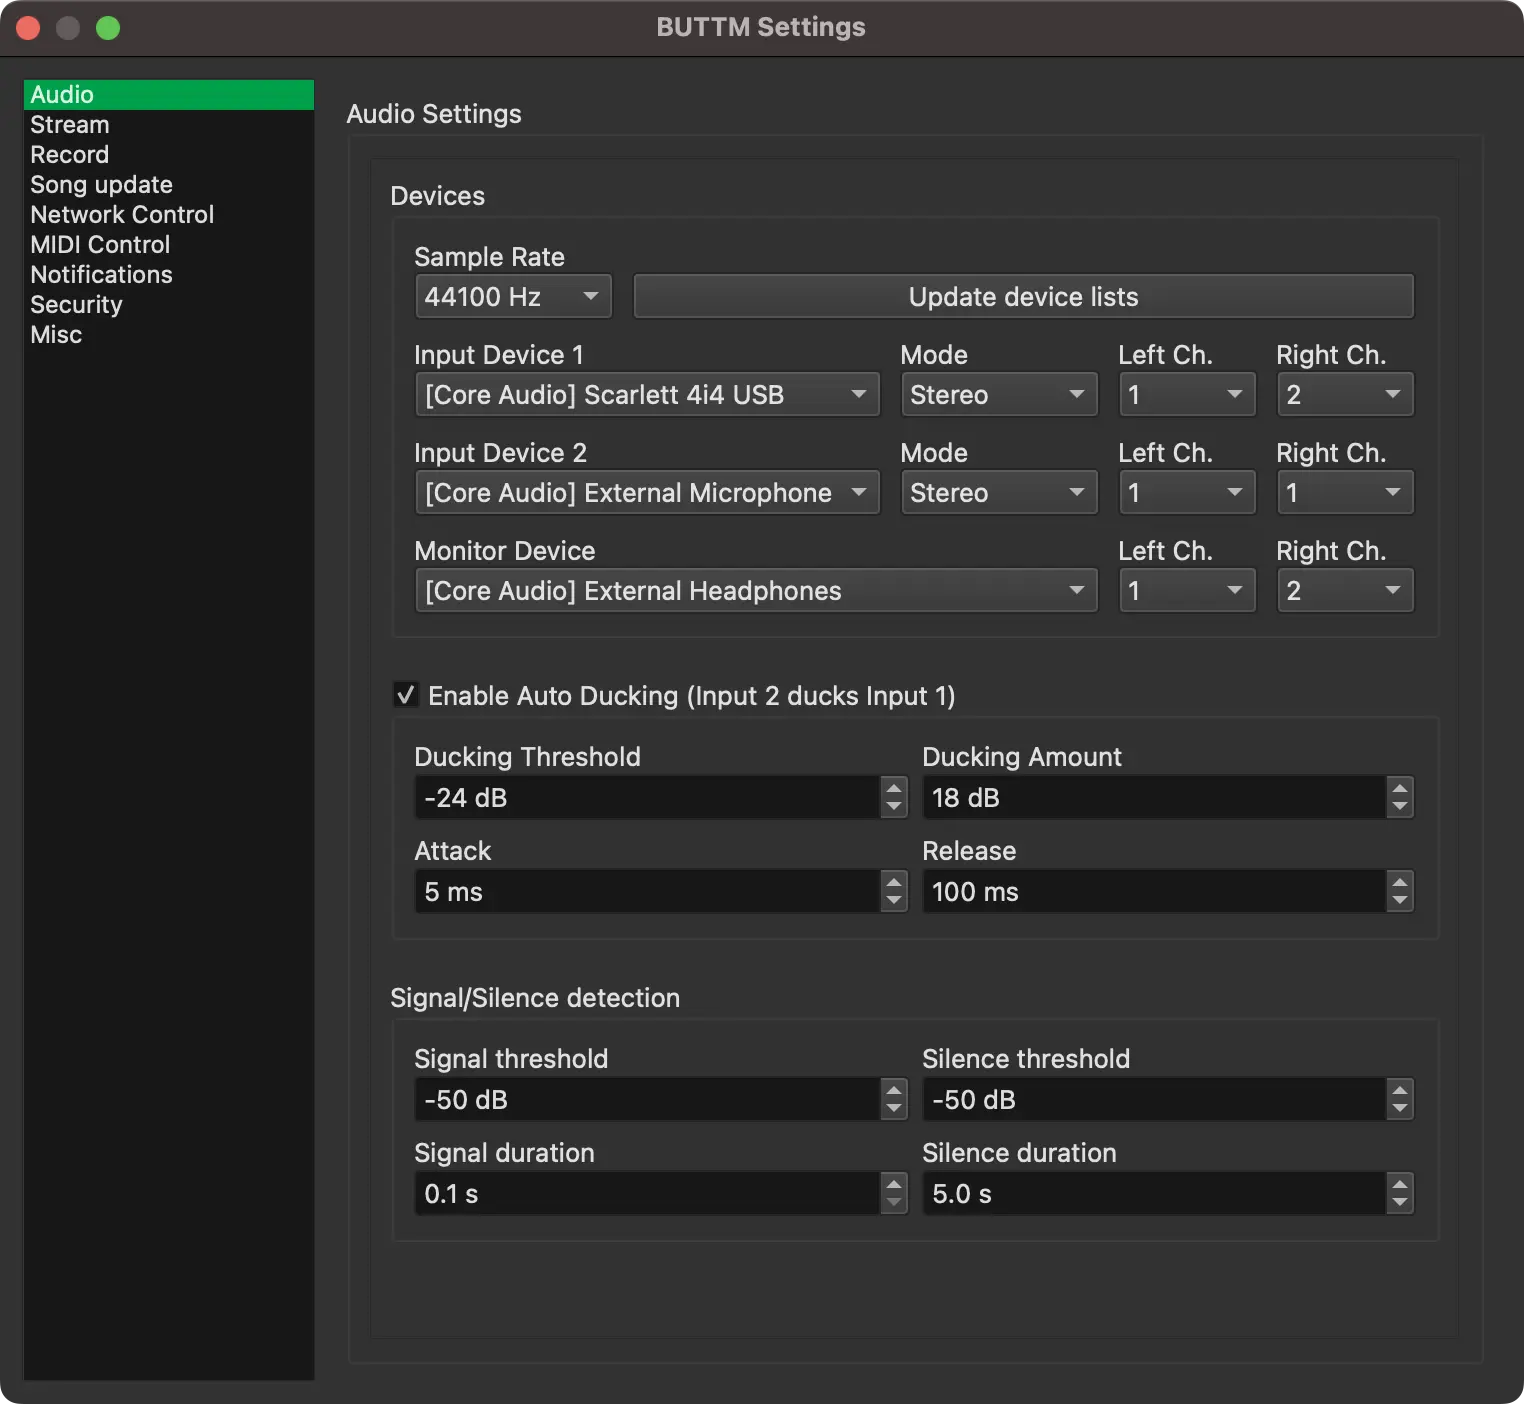
Audio
The Audio settings page is one of the most important sections. Here you can select the audio devices that BUTTM should use for broadcasting and recording.
Settings: Audio
Devices
Update device lists:
Click this button to search for new audio devices that were connected while BUTTM was running. BUTTM caches the supported sample rates of each device so startup is faster on subsequent launches. If you suspect the cache is stale, hold Shift while clicking the button to force a complete rescan and bypass the cache.
Sample Rate:
Set the global sample rate for all audio devices. Each device runs at the rate you choose here.
If the selected rate differs from the rate configured in your audio driver or operating system, BUTTM automatically converts the audio to the selected rate.
Tip
To avoid unnecessary sample rate conversions, which increase CPU usage and reduce audio quality, ensure that the device driver sample rate, the BUTTM device sample rate and the codec sample rate (see Encoder Manager) are all set to the same value.
Input Device 1:
Select your main audio input device. If you use only one input device, select it here.
Input Device 2:
Select your secondary audio input device. A typical example is a microphone.
You can optionally enable auto ducking to reduce the level of Input 1 whenever Input 2 becomes active.
Tip
On Windows you can loop back an output device to an input device. This is helpful when you want to stream audio from desktop applications. Devices that support loopback have [Loopback] in their name.
Monitor Device:
This is an output device. It allows you to preview your audio before going online.
Left Ch.:
Select which channel number should be used for the left audio channel.
Right Ch.:
Select which channel number should be used for the right audio channel.
Mono:
When enabled, BUTTM sums the left and right channels of the selected input device to a mono signal. This option is only available for devices with more than one channel.
Enable ASIO support (Windows only):
On Windows you can enable ASIO support if required. By default this option is disabled because it can have side effects.
Warning
Enabling ASIO support may cause BUTTM to interact with other audio applications during startup or when audio settings are changed.
For example, Spotify may stop playback of the current track.
Channel Mode
Here you can independently set the streaming and recording output to either Mono or Stereo.
Auto Ducking
Enable Auto Ducking:
When enabled, BUTTM reduces the level of the selected ducking destination once the signal level of Input 2 rises above a defined threshold.
Ducking Destination:
Selects which signal is attenuated when Input 2 becomes active. You can choose either Input Device 1 or the Audio Player output. For example, selecting the Audio Player allows you to automatically lower the music from the player whenever you speak into your microphone on Input 2.
Ducking Threshold:
Ducking remains active while the Input 2 level is above this threshold.
Ducking Amount:
Defines how much the ducking destination is attenuated when ducking is active.
Attack:
Defines how long it takes until ducking becomes active after the threshold is exceeded.
Release:
Defines how long it takes until ducking is disabled again after the Input 2 level falls below the threshold.
VU-Meter
Show short-term LUFS:
BUTTM shows short-term LUFS: a rolling measurement over a few seconds of audio. It responds faster than integrated loudness (measured over an entire program or file) and is useful while you are live.
When enabled, the short-term LUFS value appears at the top of the VU meter in the main window and above each channel strip in the Mixer. Turn this off if you prefer peak and RMS only.
Info
LUFS (Loudness Units relative to Full Scale) measures perceived loudness, not electrical peak level. Unlike a peak meter, which only reports the highest instantaneous sample, LUFS accounts for level and duration using a standardized loudness model (ITU-R BS.1770). Values are given in loudness units relative to full scale: more negative numbers mean quieter material. Many broadcast and streaming guidelines target integrated loudness around -14 to -16 LUFS for mixed music and speech, though exact targets depend on the platform.
Signal and Silence Detection
BUTTM can trigger certain actions, such as starting or stopping a stream, based on the audio level for a specified amount of time.
Signal threshold:
A signal detected event occurs once the level rises above this threshold.
Signal duration:
Defines how long the level must remain above the threshold before a signal detected event is issued.
Silence threshold:
A silence detected event occurs once the level falls below this threshold.
Silence duration:
Defines how long the level must remain below the threshold before a silence detected event is issued.
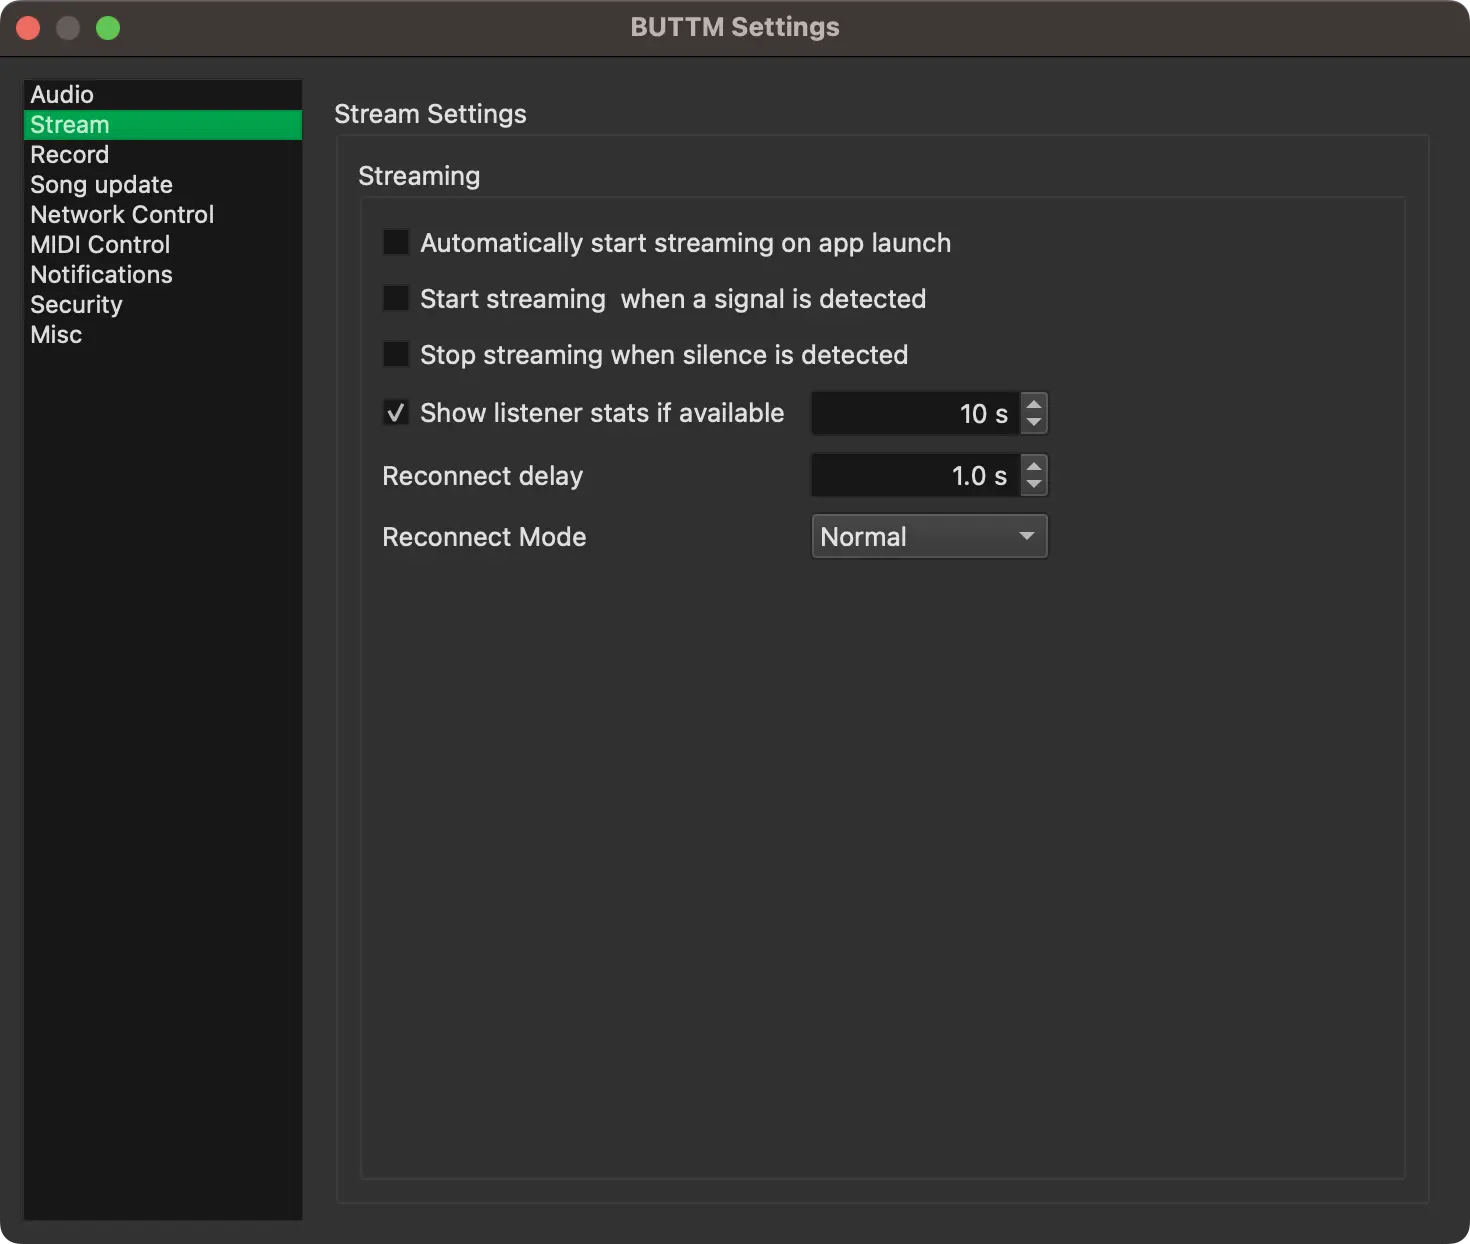
Stream
On the Stream settings page you can adjust streaming behavior.
Settings: Stream
Automatically start streaming on app launch:
Enable this if you want BUTTM to connect all enabled stations when the application starts.
Start streaming when a signal is detected:
Enable this if you want BUTTM to connect all enabled stations when a signal detected event occurs (see Signal and Silence Detection).
Stop streaming when silence is detected:
Enable this if you want BUTTM to disconnect all enabled stations when a silence detected event occurs.
Show listener stats if available:
Enable this if you want BUTTM to retrieve and display the number of active listeners in the specified interval.
Note
If listener numbers do not appear in the main window during a broadcast, your stream hoster likely does not provide this information or you need to specify a Custom Listeners URL/Mountpoint in your server settings.
Reconnect delay:
Defines how many seconds BUTTM waits before attempting to reconnect.
Reconnect mode:
There are three reconnect modes:
- Never: BUTTM never reconnects.
- Normal: BUTTM reconnects when the mount point is in use or the connection was lost during a broadcast.
- Always: BUTTM reconnects regardless of the server error message.
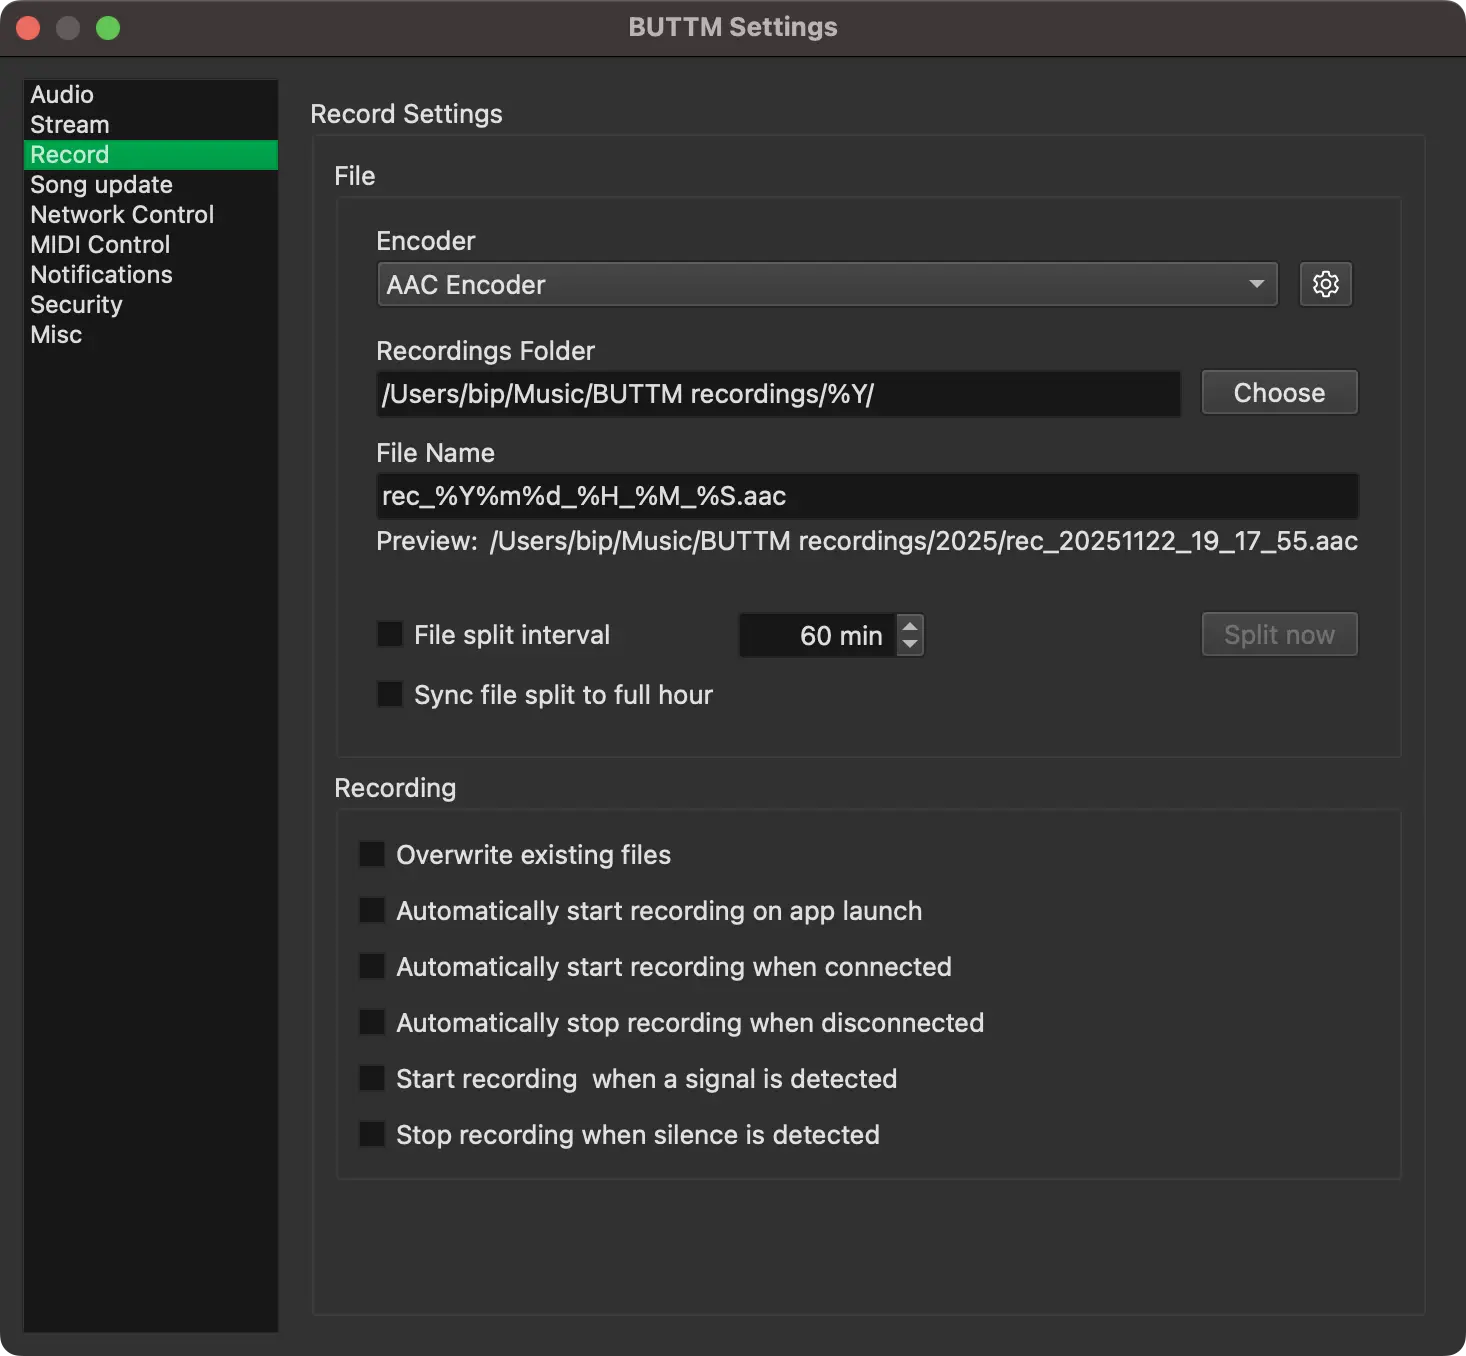
Record
On the Record settings page you can adjust recording behavior.
Settings: Record
File
Encoder:
Select which encoder, as defined in the Encoder Manager, should be used for recording.
Recordings Folder:
Choose the folder where recordings should be stored. You can enter the path manually or click Choose to select one.
File name:
Define the file name for your recordings.
Both the Recordings Folder and the File name fields may contain specifiers. Below you find a table with valid specifiers and their meaning.
| Specifier | Description |
|---|---|
%i |
Adds an index number to the file name |
%a |
Abbreviated weekday name (e.g. Mon, Tue) |
%A |
Full weekday name (e.g. Monday, Tuesday) |
%b |
Abbreviated month name (e.g. Jan, Feb) |
%B |
Full month name (e.g. January, `February) |
%d |
Day of month as zero-padded decimal number (01-31) |
%H |
Hour (24-hour clock) as zero-padded decimal (00-23) |
%I |
Hour (12-hour clock) as zero-padded decimal (01-12) |
%j |
Day of year as zero-padded decimal (001-366) |
%m |
Month as zero-padded decimal (01-12) |
%M |
Minute as zero-padded decimal (00-59) |
%p |
AM/PM indicator |
%S |
Seconds as zero-padded decimal (00-59) |
%U |
Week number of the year as decimal (00-53),, with Sunday as the first day of the week |
%w |
Weekday as decimal (0-6), where 0 = Sunday, 1 = Monday, ..., 6 = Saturday |
%W |
Week number of the year as decimal (00-53), with Monday as the first day of the week |
%y |
Year within century as zero-padded decimal (00-99) |
%Y |
Year with century as decimal (e.g. 2025) |
%Z |
Time-zone abbreviation |
Record file name specifiers
File split interval:
Define the interval at which a new recording file should be automatically created.
Sync file split to full hour:
Enable this option to align file splitting with the full hour. For example, if the interval is set to 30 minutes and the current time is 8:55, the first split occurs at 9:00. After that a new file is created every 30 minutes.
Split now:
Click this button to create a new recording file immediately.
Recording
Overwrite existing files:
Enable to overwrite existing files without asking for confirmation.
Automatically start recording on app launch:
Enable if you want BUTTM to start recording when the application starts.
Automatically start recording when connecting:
Enable if you want BUTTM to start recording when at least one station starts to connecting.
Automatically start recording when connected:
Enable if you want BUTTM to start recording when at least one station is connected.
Automatically stop recording when disconnected:
Enable if you want BUTTM to stop recording when all stations are disconnected.
Start recording when a signal is detected:
Enable if you want BUTTM to start recording when a signal detected event occurs (see Signal/Silence Detection).
Stop recording when silence is detected:
Enable if you want BUTTM to stop recording when a silence detected event occurs.
File Management
The File Management section on the Record page allows you to automatically delete recordings that exceed a specified age.
Automatically delete recordings older than N days:
Enable this option and enter the number of days after which recordings should be removed.
Files are normally processed when the application closes. If you want to run the cleanup immediately, click Clean up now.
For safety reasons, files are moved to the Trash instead of being permanently deleted.
Song Update
BUTTM offers several modules to retrieve song information automatically and send it to the server, so your listeners know what is currently playing.
To activate a module, enable the checkbox next to its title (for example, Update song from text file).
from text file
Use this option to read current song information from a text file. BUTTM checks the file every second. When a change is detected, the new song information is sent to the server.
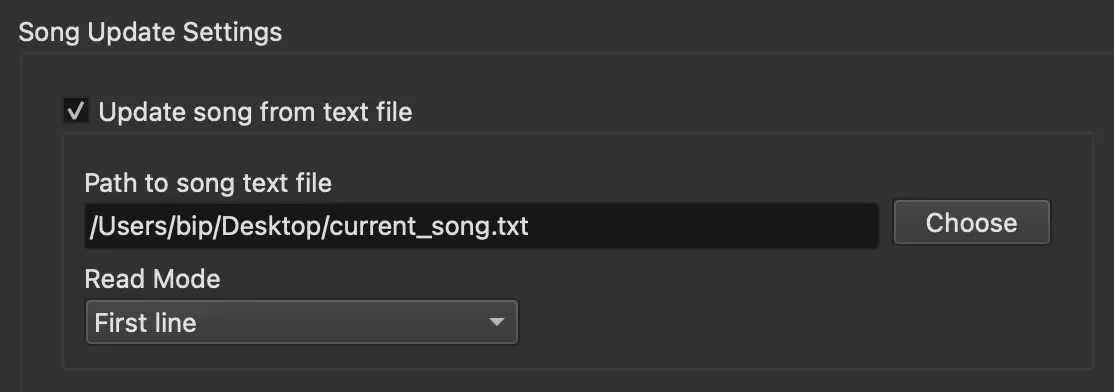
Settings: Update song from text file
Path to song text file:
Enter the path to the text file or click Choose to select it.
Read Mode:
BUTTM supports three file reading modes:
- First line: Use the first line of the file as the song information.
- Last line: Use the last line of the file as the song information.
- First two lines: The first line is interpreted as the artist and the second line as the title.
Output Format:
If First two lines is selected as the read mode, you can define how the song information should be formatted.
The default value is %ARTIST% - %TITLE%.
For example, if the first line is Sia and the second line is Unstoppable, the song information sent to the server will be Sia - Unstoppable.
Note
It is recommended that the song text file is encoded in UTF-8.
from window title
To update the song information from a window title, for example from Spotify, enable this feature and select the corresponding application name. Click on Update list to refresh the list of available applications.
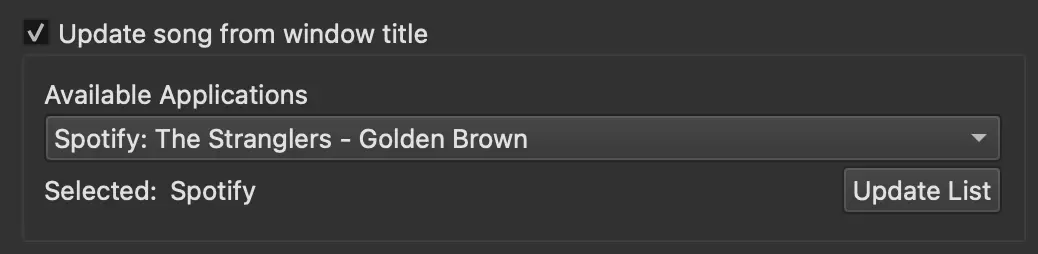
Settings: Update song from window title
Remove text from title:
If the window title contains text that should not appear in the song information, enter it here. BUTTM removes all occurrences of the specified text from the window title before using it as the song title. Any leading or trailing whitespace left after the removal is trimmed automatically.
For example, if VLC shows Sia - Unstoppable - VLC media player as its window title, enter - VLC media player to get Sia - Unstoppable as the song title.
Note
macOS:
If only BUTTM appears in the application list, make sure that BUTTM has Accessibility permission enabled in the Privacy and Security system settings.
from application
Use this module to retrieve the current song information directly from an audio application.

Settings: Update song from application
Application:
Select the application that should provide the track information. The currently supported applications are:
- Apple Music / iTunes
- Spotify
- VOX
Output format:
Define how the song information should be formatted. Applications usually provide an artist and a title.
With the default format %ARTIST% - %TITLE%, BUTTM would output Sia - Unstoppable if the artist is Sia and the title is Unstoppable.
Note
This feature is currently only available on macOS!
from Audio Player
When this option is enabled, BUTTM automatically updates the current song information whenever a track goes LIVE on one of the Audio Player decks.

Settings: Update song from Audio Player
Output format:
Define how the song information should be formatted. The default value %ARTIST% - %TITLE% produces output such as Sia - Unstoppable.
from URL
Use this module to retrieve the current song information from a web URL. BUTTM downloads a file from the specified server and uses the first line of that file as the song information.
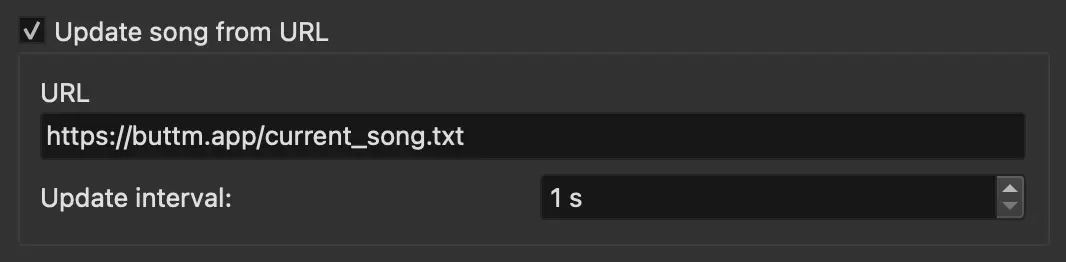
Settings: Update song from URL
URL:
Enter the URL from which the song information should be retrieved.
Update interval:
Define how often BUTTM should check the URL for updated song information.
from network
If you want to receive song information from a network client, you can use this update module.
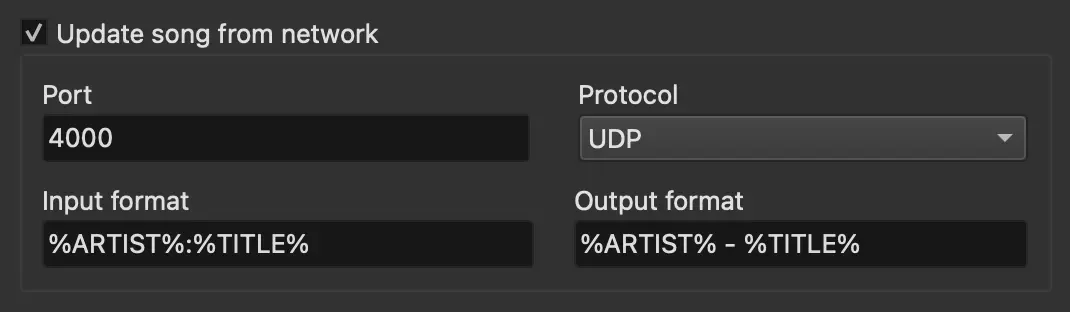
Settings: Update song from network
Port:
Enter the network port on which BUTTM should receive song information.
Protocol:
Select the protocol used by the client. Choose either UDP or TCP.
Input format:
Specify how the network client formats the incoming data.
The default value %ARTIST%:%TITLE% means that the client sends artist and title separated by a colon.
Output format:
Define how the song information should be formatted after parsing.
With the default format %ARTIST% - %TITLE%, BUTTM outputs Sia - Unstoppable if the client sends Sia:Unstoppable.
Misc
This section allows you to fine-tune the song update feature.
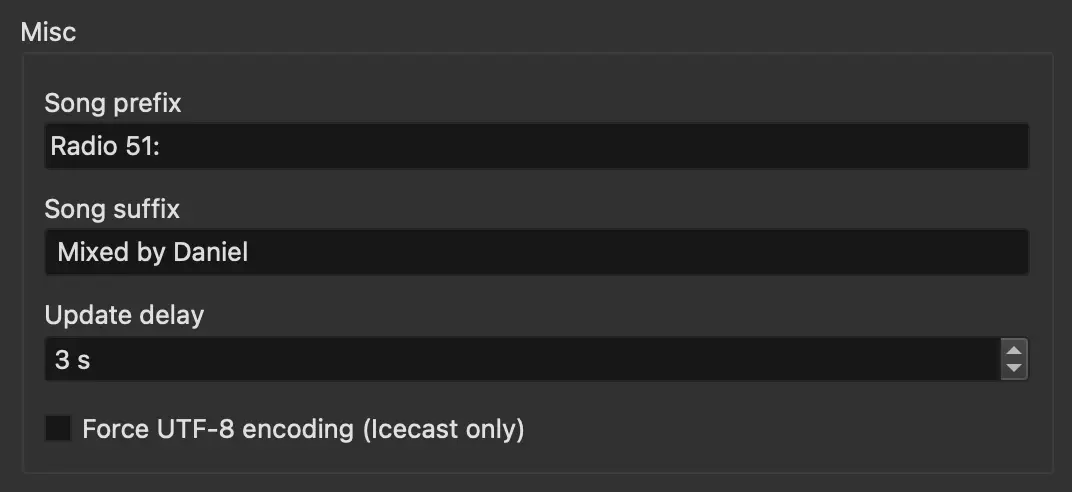
Settings: Misc
Song prefix:
A text prefix that is added before the song information sent to the server.
Song suffix:
A text suffix that is added after the song information sent to the server.
Update delay:
Icecast- and Shoutcast-based systems often introduce several seconds of audio delay.
Use this setting to delay the song update so that it aligns more closely with the audio stream.
Note
The song information text field in the BUTTM main window is updated immediately, even if a delay is set. The delay only affects when the updated song information is sent to the server.
Force UTF-8 encoding:
If you encounter issues with artist or title names that contain non-ASCII characters, first ensure that your input data (e.g. text file) is UTF-8 encoded.
If problems persist, enable this option. It instructs the Icecast server that the transmitted song information uses UTF-8 encoding.
Song Protocol
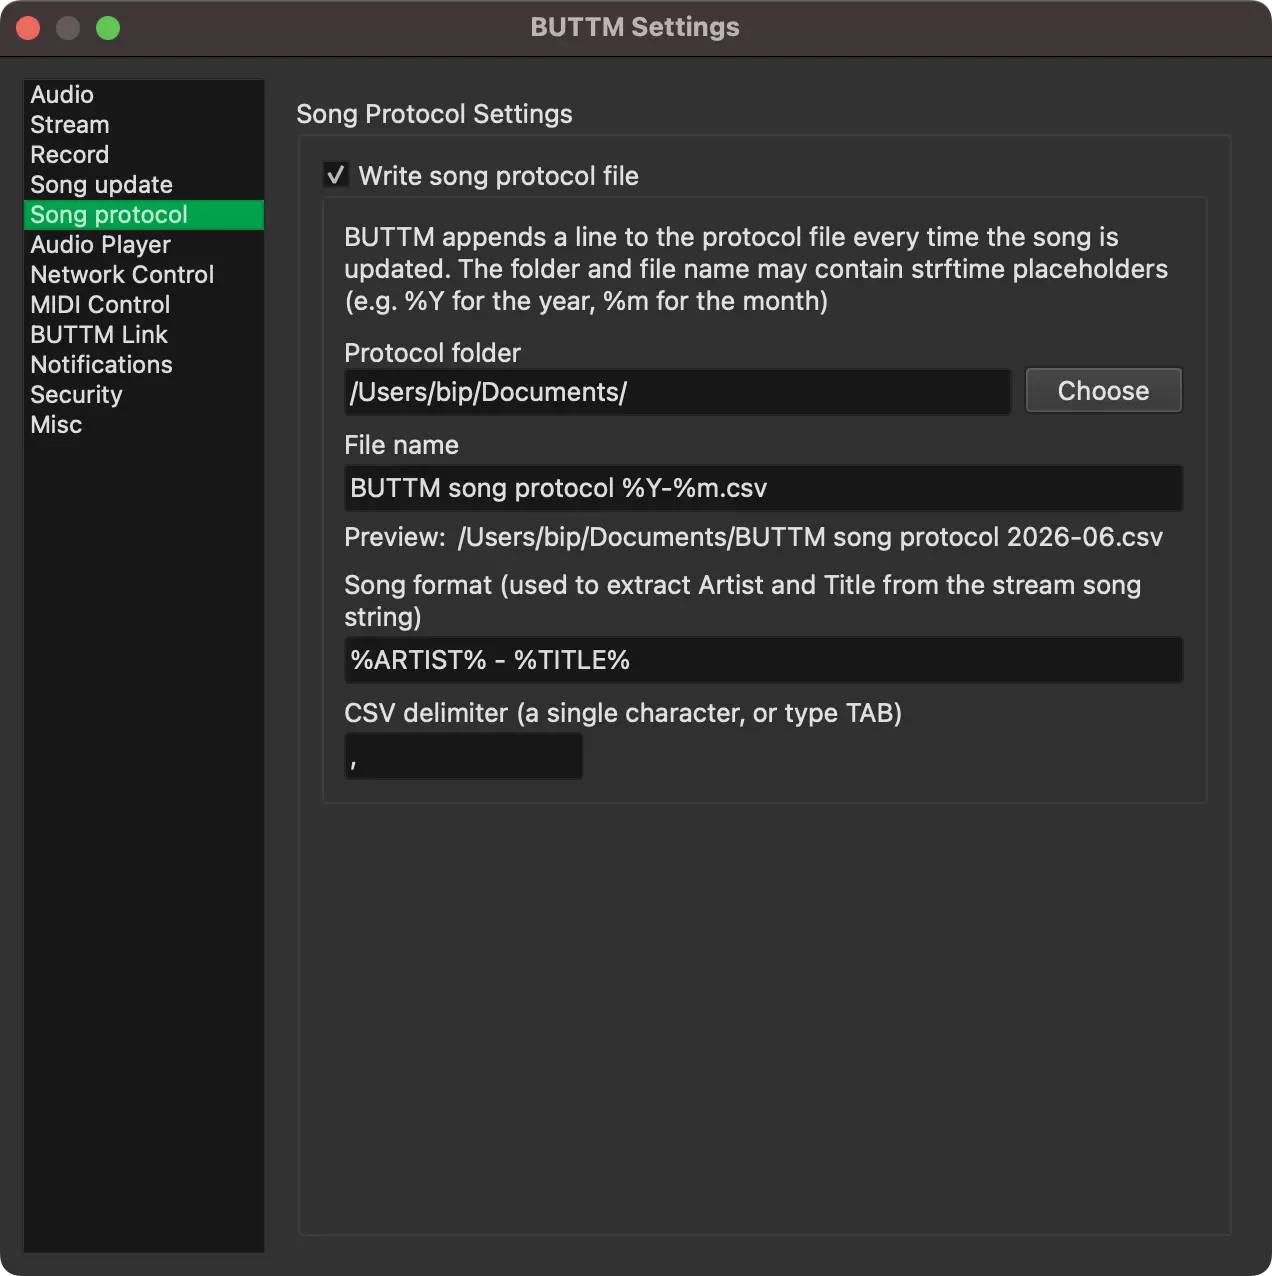
Use this feature to keep a log (protocol) of every song that BUTTM plays. Whenever the current song is updated, BUTTM appends one line to a CSV protocol file. The folder and file name both support strftime placeholders so the file can be rotated automatically — by default a new file is started every month. This is useful for reporting, archiving, or for royalty/playlist submissions.
Settings: Song protocol
To enable the feature, activate the checkbox next to the Write song protocol file group box title. While enabled, a new line is written to the protocol file every time the song is updated, regardless of which Song Update module (or manual entry) triggered the change.
Protocol folder:
The folder in which the protocol file is stored. Click Choose to pick a folder from the file system, or type the path directly. The folder may contain placeholders (for example %Y for the four-digit year). By default this field contains your Documents folder and no placeholders are added.
File name:
The name of the protocol file inside the selected folder. The file name may also contain placeholders. The default is BUTTM song protocol %Y-%m.csv, which starts a fresh file at the beginning of each calendar month (%Y = year, %m = zero-padded month number). If the file does not exist yet, BUTTM creates it and writes a header row first. If it already exists, new entries are appended.
Info
See table below for a list of allowed specifiers.
Song format:
Define how artist and title are extracted from the raw song string. This works like the input format of the other song modules, but in reverse: BUTTM matches the song string against the format and pulls out the placeholder values.
For example, with the default format %ARTIST% - %TITLE%, the song string Sia - Unstoppable is split into the artist Sia and the title Unstoppable.
If no Artist and no Title can be extracted from the raw song string (e.g. song is empty), no new entry is created.
CSV delimiter:
The single character used to separate the columns. The default is a comma (,). Enter a different character (for example ; or |) if your target software expects another separator, or type TAB to use a tab character (TSV).
Each line in the protocol file contains the following columns:
| Column | Description |
|---|---|
| Date | The date the song was updated (YYYY-MM-DD). |
| Time | The time the song was updated (HH:MM:SS). |
| Artist | The artist extracted from the song string using the Song format. |
| Title | The title extracted from the song string using the Song format. |
| Song | The raw song string that was sent to the server (including any prefix/suffix). |
| Total listeners | The combined number of listeners across all connected stations at that moment. |
Protocol file format
| Specifier | Description |
|---|---|
%a |
Abbreviated weekday name (e.g. Mon, Tue) |
%A |
Full weekday name (e.g. Monday, Tuesday) |
%b |
Abbreviated month name (e.g. Jan, Feb) |
%B |
Full month name (e.g. January, `February) |
%d |
Day of month as zero-padded decimal number (01-31) |
%H |
Hour (24-hour clock) as zero-padded decimal (00-23) |
%I |
Hour (12-hour clock) as zero-padded decimal (01-12) |
%j |
Day of year as zero-padded decimal (001-366) |
%m |
Month as zero-padded decimal (01-12) |
%M |
Minute as zero-padded decimal (00-59) |
%p |
AM/PM indicator |
%S |
Seconds as zero-padded decimal (00-59) |
%U |
Week number of the year as decimal (00-53),, with Sunday as the first day of the week |
%w |
Weekday as decimal (0-6), where 0 = Sunday, 1 = Monday, ..., 6 = Saturday |
%W |
Week number of the year as decimal (00-53), with Monday as the first day of the week |
%y |
Year within century as zero-padded decimal (00-99) |
%Y |
Year with century as decimal (e.g. 2025) |
%Z |
Time-zone abbreviation |
Protocol folder/file name specifiers
Audio Player
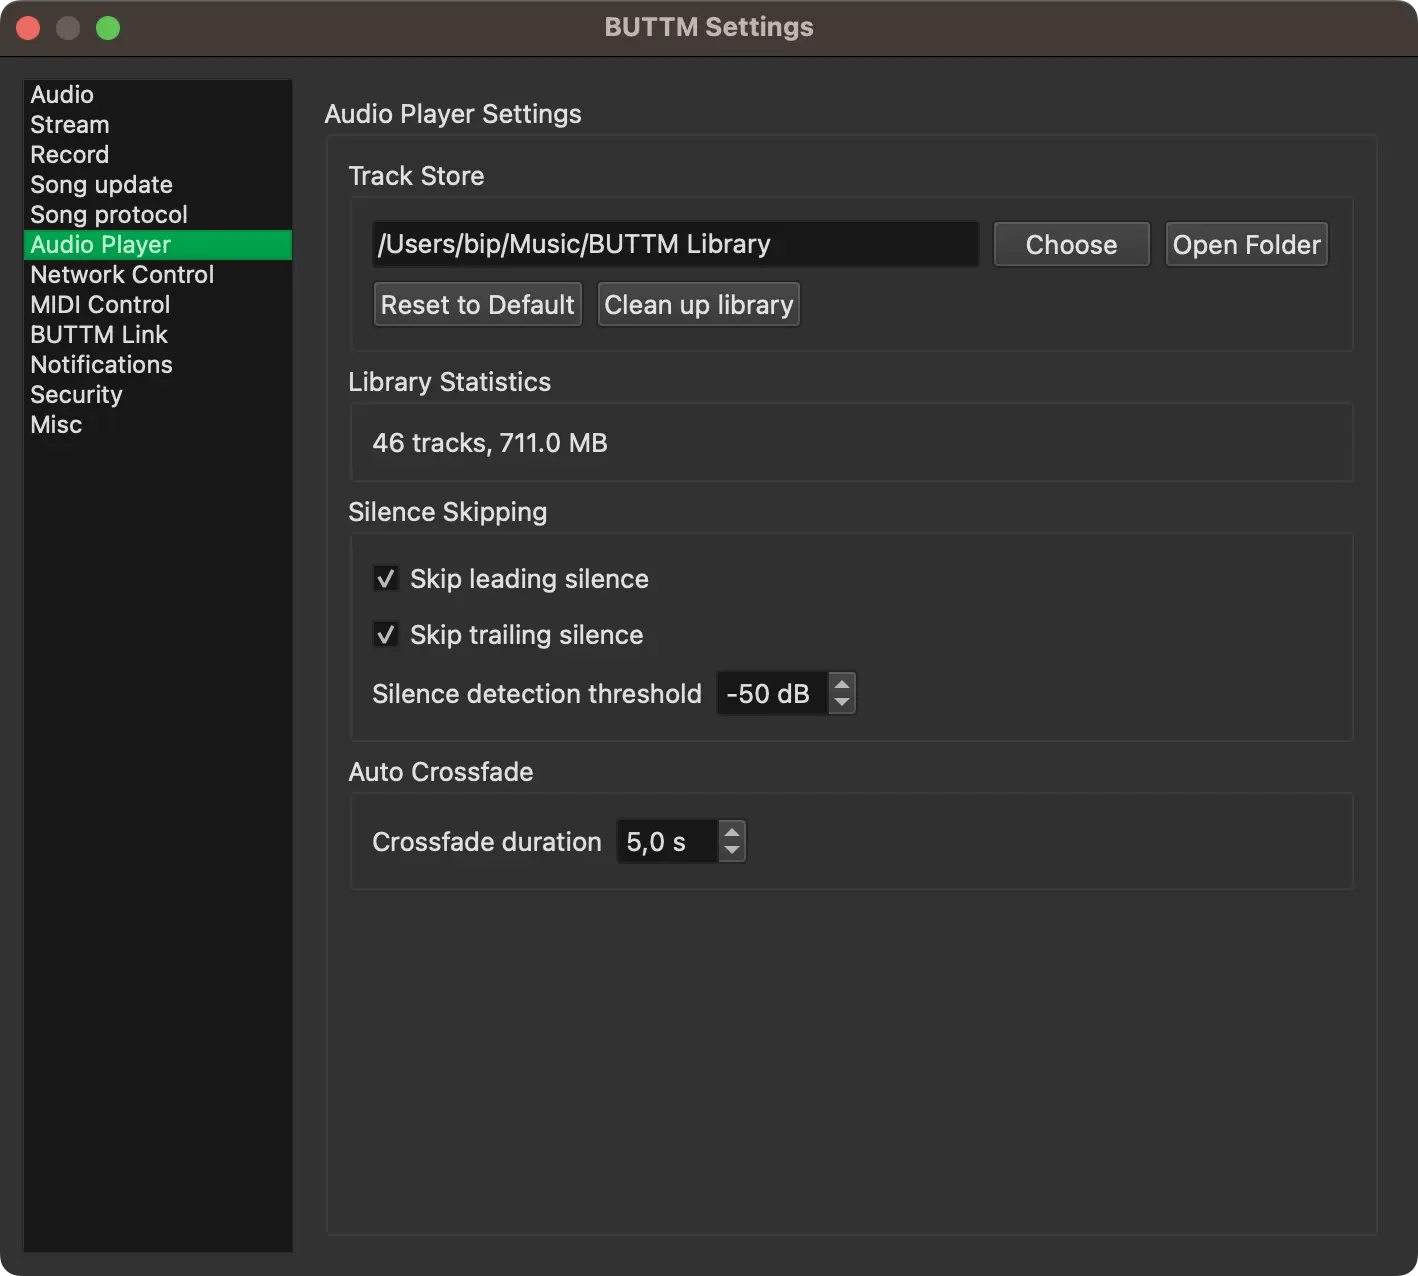
The Audio Player settings page controls the behaviour of the built-in Audio Player.
Settings: Player
Track storage folder:
Choose the folder where BUTTM stores the audio files it imports into the library. You can click Choose to select one.
Auto Crossfade
Crossfade duration:
The time the crossfader takes to blend over from one Deck to the other Deck if Auto Crossfade in the Show List of the Audio Player is enabled.
Loudness Normalization
Normalize playback loudness:
Enables non-destructive loudness normalization for tracks played on the decks and Soundboard. Tracks are measured when needed and the resulting gain is applied separately from the deck or Soundboard volume control. See Loudness Normalization for details.
When you enable this option, BUTTM asks whether to measure all unmeasured tracks now or measure them as they are loaded. The prompt only appears if there are still unmeasured tracks in the library.
Analyze all tracks:
Starts measuring every unmeasured track in the library in the background. Already measured tracks are skipped.
Target loudness:
Sets the desired integrated loudness in LUFS. More negative values produce quieter playback and leave more headroom. Typical values are -14 LUFS for music streaming, -16 LUFS for mixed music and speech, and -23 LUFS for EBU R128 broadcast workflows.
True-peak ceiling:
Sets the maximum true-peak level (in dBTP) that a boosted track is allowed to reach. Normalization reduces its boost as needed to stay at or below this ceiling, so it never introduces clipping. Lower (more negative) values leave more headroom; -1 dBTP is a common default for streaming and broadcast delivery.
Maximum boost: Sets a sanity cap, in dB, on how much gain normalization may add to a very quiet track. This prevents an unusually quiet master from jumping out at an unexpectedly loud level.
Silence Skipping
Start playback at Start cue point:
When enabled, each deck automatically skips to the track's Start cue point when playback begins, instead of starting at 0:00. The Detection threshold field controls where this cue point is placed for newly imported tracks. You can also inspect and adjust it per track in the Track Properties dialog.
Stop playback at End cue point:
When enabled, each deck considers the track finished once it reaches the End cue point, rather than waiting for the absolute end of the file. This is useful when tracks have long silent tails.
Detection threshold:
The signal level in dBFS below which a sample is considered silence when automatically placing the Start and End cue points on newly imported tracks.
Detect Start / End Cue Points:
Changing the detection threshold only affects tracks imported from now on. Click this button to re-run automatic detection for every track already in your library.
Network Control
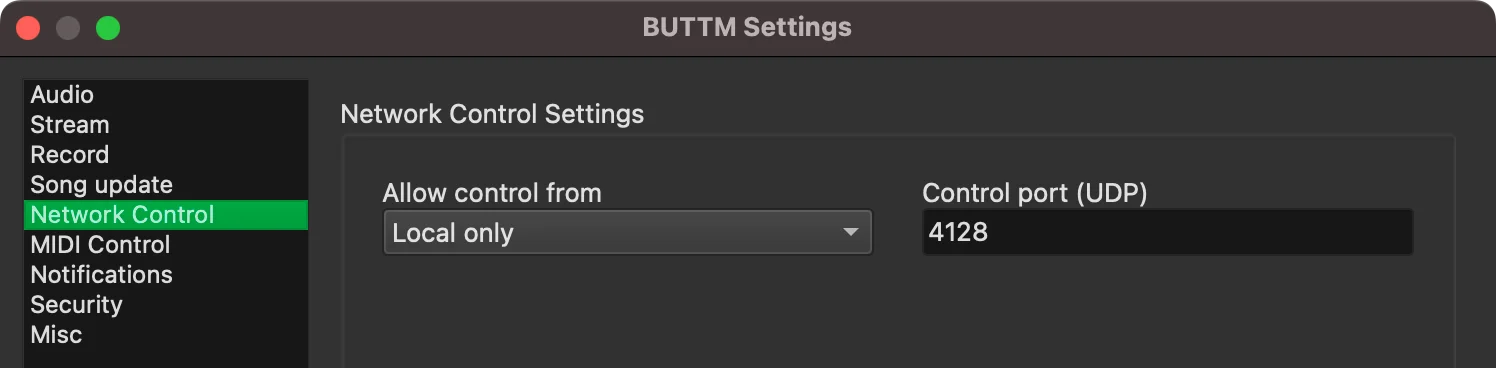
Network Control allows you to control BUTTM over the network or internet. This can be useful if you want to integrate BUTTM into an automation system. When enabled, BUTTM starts a UDP server and waits for incoming commands, which are described below.
Settings: Network Control
Allow control from:
- Disabled: Disables network control.
- Local only: Allows control only from the same machine on which BUTTM is running.
- Network: Allows control from any machine in your local network.
Warning
When Network is selected, anyone with access to your network can send control commands to BUTTM. Use this setting only in a secure environment.
Control port (UDP):
Define the UDP port on which BUTTM should listen for control commands.
Control Commands
BUTTM expects commands formatted as COMMAND:PARAMETER. Most commands do not require a parameter. In such cases, the parameter can be omitted and the command becomes COMMAND.
The table below lists the available commands.
| Command | Parameter | Description |
|---|---|---|
| CONNECT ALL | - | Connects all enabled stations |
| DISCONNECT ALL | - | Disconnects all connected stations |
| CONNECT STATION | Station name | Connects a specific station |
| DISCONNECT STATION | Station name | Disconnects a specific station |
| START RECORDING | - | Starts recording |
| STOP RECORDING | - | Stops recording |
| SPLIT RECORDING | - | Creates a new recording file |
| SET SONG TITLE | Song title | Updates the current song information on the server |
| MUTE INPUT | 1 or 2 | Mutes input 1 or input 2 |
| UNMUTE INPUT | 1 or 2 | Unmutes input 1 or input 2 |
| MUTE STREAM | - | Mutes the streaming output channel |
| UNMUTE STREAM | - | Unmutes the streaming output channel |
| MUTE RECORDING | - | Mutes the recording output channel |
| UNMUTE RECORDING | - | Unmutes the recording output channel |
| MUTE MONITOR | - | Mutes the monitor output channel |
| UNMUTE MONITOR | - | Unmutes the monitor output channel |
| MUTE PLAYER | - | Mutes the Audio Player channel |
| UNMUTE PLAYER | - | Unmutes the Audio Player channel |
| MUTE BUTTM-LINK | - | Mutes the BUTTM Link channel |
| UNMUTE BUTTM-LINK | - | Unmutes the BUTTM Link channel |
| SET GAIN | CHANNEL:value_dB | Sets the gain of a mixer channel in dB |
| INC GAIN | CHANNEL:step_dB | Increases the gain of a mixer channel by the given step in dB |
| DEC GAIN | CHANNEL:step_dB | Decreases the gain of a mixer channel by the given step in dB |
| GET STATUS | - | Returns the current system status as a JSON object (see below) |
| GET STATUS V1 | - | Returns the status in the legacy flat format for older clients |
| QUIT | - | Stops all streams and closes BUTTM |
Network commands
Valid channel names for SET GAIN, INC GAIN and DEC GAIN are: INPUT1, INPUT2, PLAYER, BUTTM-LINK, STREAM, RECORDING, MONITOR and MASTER.
Status Reply
After sending a GET STATUS command the following JSON object is returned:
Note
The status format was changed in BUTTM version 1.2.0.
Use GET STATUS V1 if you need the older flat format for backward compatibility with existing integrations.
{
    "statusVersion": 2,
    "song": {
        "current": "Sia - Unstoppable"
    },
    "recording": {
        "active": true,
        "seconds": 5,
        "kBytes": 80,
        "path": "/Users/daniel/Music/BUTTM recordings/rec_20251123_10_42_35.aac"
    },
    "mixer": {
        "input1": {
            "gain": 0.0,
            "muted": false,
            "levelPeakLeft": -4.76,
            "levelPeakRight": -4.78,
            "levelMeanLeft": -12.3,
            "levelMeanRight": -12.5,
            "monitorEnabled": false
        },
        "input2": { "gain": 0.0, "muted": false, "monitorEnabled": false },
        "player": { "gain": 0.0, "muted": false, "monitorEnabled": false },
        "buttmLink": { "gain": 0.0, "muted": false, "monitorEnabled": false },
        "stream": { "gain": 0.0, "muted": false, "monitorEnabled": false },
        "recording": { "gain": 0.0, "muted": false, "monitorEnabled": false },
        "monitor": { "gain": 0.0, "muted": false },
        "master": { "gain": 0.0 },
        "crossFader": 0
    },
    "stations": [
        {
            "enabled": true,
            "encoderName": "MP3 Encoder",
            "listeners": 65,
            "serverName": "Icecast",
            "state": "offline",
            "stationName": "Station #1",
            "streamKBytes": 0,
            "streamSeconds": 0
        },
        {
            "enabled": true,
            "encoderName": "AAC Encoder",
            "listeners": 78,
            "serverName": "shoutcast",
            "state": "online",
            "stationName": "Station #2",
            "streamKBytes": 3056,
            "streamSeconds": 191
        }
    ]
}
Info
recording.seconds is always measured relative to the moment the recording started.
recording.kBytes reflects the size of the current recording file. If a file split is performed, this value resets to 0.
Examples
To connect all enabled stations send CONNECT ALL.
To connect a specific station send CONNECT STATION:Station name.
To update the current song information send SET SONG TITLE:The New Song.
To increase the gain of Input 1 by 3 dB send INC GAIN:INPUT1:3.
MIDI Control
Here you can configure your MIDI device (for example a Rodecaster) to control BUTTM.
BUTTM supports CC and NOTE ON message types. The tables below describe the MIDI implementation in detail.
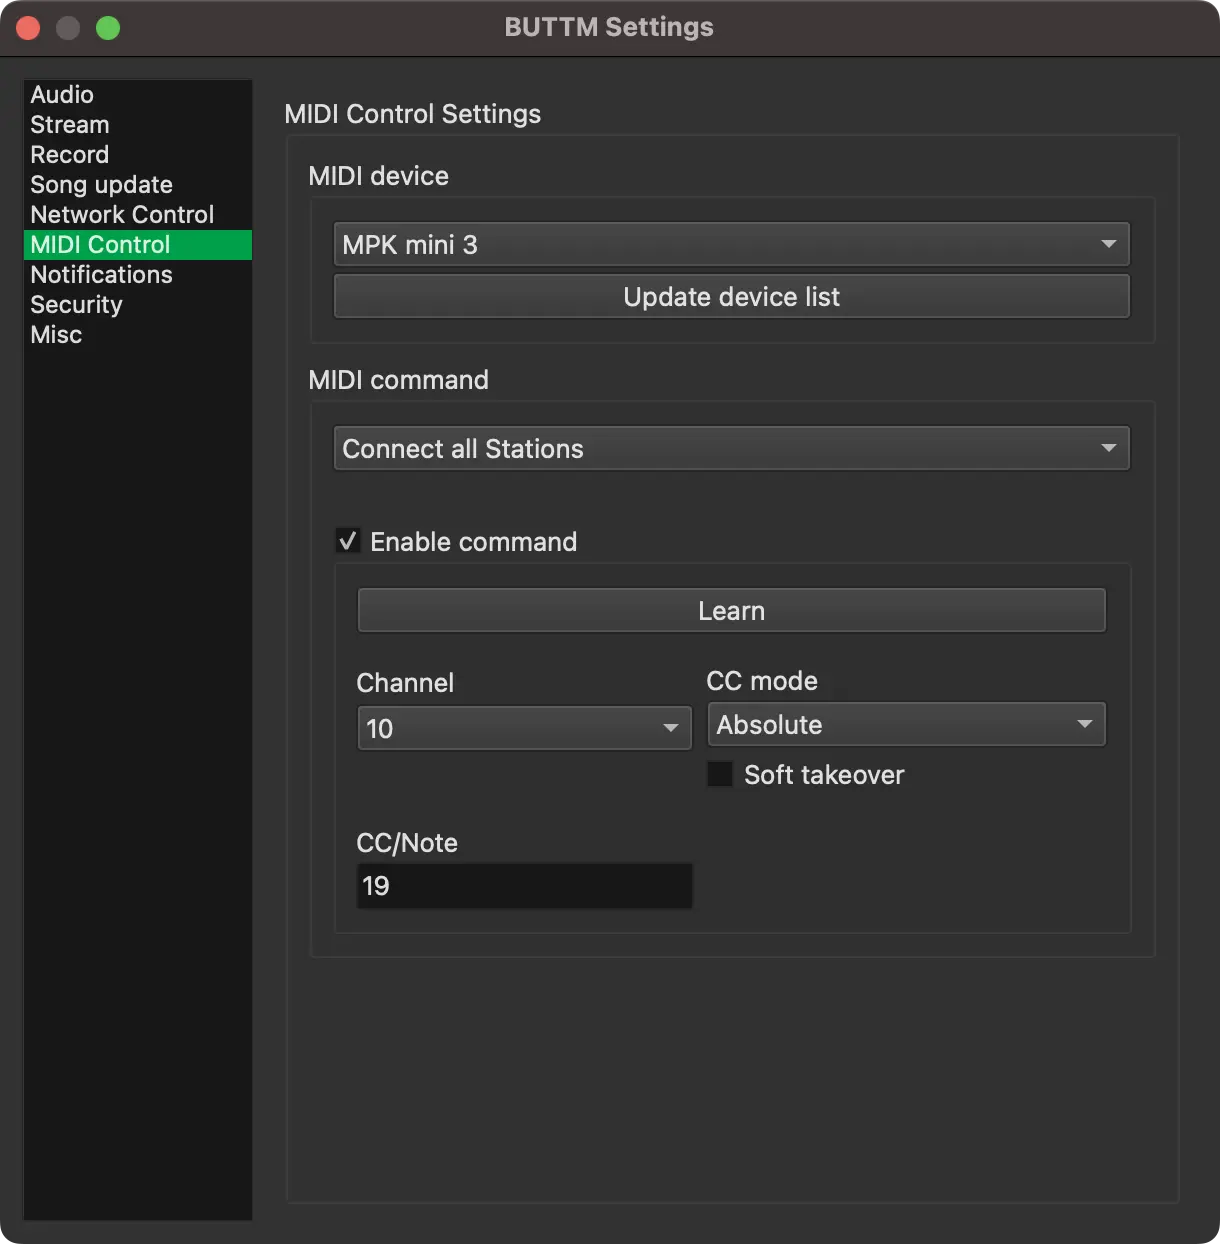
Settings: MIDI Control
MIDI device:
Select your MIDI device.
Update device list:
If you connected your MIDI device after starting BUTTM, click this button to refresh the list.
MIDI Command:
The command you want to configure.
Enable command:
Enable this option to activate the selected MIDI command.
Learn:
Click this button to activate learning mode. In this mode BUTTM listens for incoming MIDI commands.
When a valid command is received, the channel and CC or note values are assigned automatically.
Channel:
Select the MIDI channel manually or let BUTTM detect it using the Learn mode.
CC/Note:
Enter the CC number or note manually or let BUTTM detect it using the Learn mode.
CC mode:
Absolute Mode: Incoming CC values from 0 to 127 are mapped linearly to the internal range.
For example, for a volume slider, 0 maps to minimum and 127 maps to maximum volume.
Relative Modes: Incoming CC values represent increments or decrements.
Select the relative mode that matches your MIDI controller.
Soft takeover:
If you switch between adjusting a slider with the mouse and using a MIDI controller, the two can become unsynchronized.
This may cause jumps when adjusting the slider via MIDI after moving it with the mouse. Enable Soft takeover to prevent this.
Reset MIDI settings:
If your MIDI configuration becomes incorrect or unusable, click this button to restore the MIDI settings to their default values.
MIDI Implementation
CC Messages
| Command | CC value | Action |
|---|---|---|
| Connect all Stations | Any | Connects all enabled Stations |
| Disconnect all Stations | Any | Disconnects all connected Stations |
| Connect/Disconnect all Stations | > 63 / < 64 | Connects / Disconnects all enabled Stations |
| Start recording | Any | Starts recording |
| Stop recording | Any | Stops recording |
| Start/Stop recording | > 63 / < 64 | Starts recording / Stops recording |
| Input 1 gain | 0–127 (absolute mode) | Sets Input 1 gain from -18 dB (0) to +18 dB (127) |
| Input 2 gain | 0–127 (absolute mode) | Sets Input 2 gain from -18 dB (0) to +18 dB (127) |
| Audio Player gain | 0–127 (absolute mode) | Sets Audio Player gain from -18 dB (0) to +18 dB (127) |
| BUTTM Link gain | 0–127 (absolute mode) | Sets BUTTM Link gain from -18 dB (0) to +18 dB (127) |
| Streaming gain | 0–127 (absolute mode) | Sets Streaming gain from -18 dB (0) to +18 dB (127) |
| Recording gain | 0–127 (absolute mode) | Sets Recording gain from -18 dB (0) to +18 dB (127) |
| Monitor gain | 0–127 (absolute mode) | Sets Monitor gain from -18 dB (0) to +18 dB (127) |
| Master gain | 0–127 (absolute mode) | Sets Master gain from -18 dB (0) to +18 dB (127) |
| Crossfader | 0–127 (absolute mode) | Blends between Input 1 (0) and Input 2 (127) |
| Audio Player Crossfader | 0–127 (absolute mode) | Blends between Deck A (0) and Deck B (127) |
| Mute/Unmute Input 1 | Any | Toggles mute state of Input 1 |
| Mute/Unmute Input 2 | Any | Toggles mute state of Input 2 |
| Mute/Unmute Audio Player | Any | Toggles mute state of the Audio Player |
| Mute/Unmute BUTTM Link | Any | Toggles mute state of the BUTTM Link channel |
| Mute/Unmute Streaming | Any | Toggles mute state of the Streaming output |
| Mute/Unmute Recording | Any | Toggles mute state of the Recording output |
| Mute/Unmute Monitor | Any | Toggles mute state of the Monitor output |
| Deck A Play/Pause | Any | Starts or pauses playback on Deck A |
| Deck A Stop | Any | Stops playback on Deck A and returns to the beginning |
| Deck A Volume | 0–127 (absolute mode) | Sets Deck A volume from minimum (0) to maximum (127) |
| Deck A Live | Any | Toggles the on-air state of Deck A |
| Deck B Play/Pause | Any | Starts or pauses playback on Deck B |
| Deck B Stop | Any | Stops playback on Deck B and returns to the beginning |
| Deck B Volume | 0–127 (absolute mode) | Sets Deck B volume from minimum (0) to maximum (127) |
| Deck B Live | Any | Toggles the on-air state of Deck B |
| Start/Stop Show | > 63 / < 64 | Starts / Stops the Audio Player show |
NOTE ON Messages
| Command | NOTE ON value | Action |
|---|---|---|
| Connect all Stations | > 63 | Connects all enabled Stations |
| Disconnect all Stations | > 63 | Disconnects all connected Stations |
| Connect/Disconnect all Stations | > 63 | Connects / Disconnects all enabled Stations |
| Start recording | > 63 | Starts recording |
| Stop recording | > 63 | Stops recording |
| Start/Stop recording | > 63 | Starts recording / Stops recording |
| Mute/Unmute Input 1 | > 63 | Toggles mute state of Input 1 |
| Mute/Unmute Input 2 | > 63 | Toggles mute state of Input 2 |
| Mute/Unmute Audio Player | > 63 | Toggles mute state of the Audio Player |
| Mute/Unmute BUTTM Link | > 63 | Toggles mute state of the BUTTM Link channel |
| Mute/Unmute Streaming | > 63 | Toggles mute state of the Streaming output |
| Mute/Unmute Recording | > 63 | Toggles mute state of the Recording output |
| Mute/Unmute Monitor | > 63 | Toggles mute state of the Monitor output |
| Deck A Play/Pause | > 63 | Starts or pauses playback on Deck A |
| Deck A Stop | > 63 | Stops playback on Deck A and returns to the beginning |
| Deck A Live | > 63 | Toggles the on-air state of Deck A |
| Deck B Play/Pause | > 63 | Starts or pauses playback on Deck B |
| Deck B Stop | > 63 | Stops playback on Deck B and returns to the beginning |
| Deck B Live | > 63 | Toggles the on-air state of Deck B |
| Start/Stop Show | > 63 | Starts / Stops the Audio Player show |
Info
Some MIDI devices send a NOTE ON message with a value below 64 when a key is released instead of sending a NOTE OFF message.
To avoid false triggers, BUTTM only accepts NOTE ON messages with values higher than 63.
BUTTM Link
BUTTM Link allows a remote BUTTM installation to send its audio output to this instance of BUTTM over the network. The incoming audio appears as a dedicated BUTTM Link channel in the Mixer and can be streamed and recorded just like any other source.
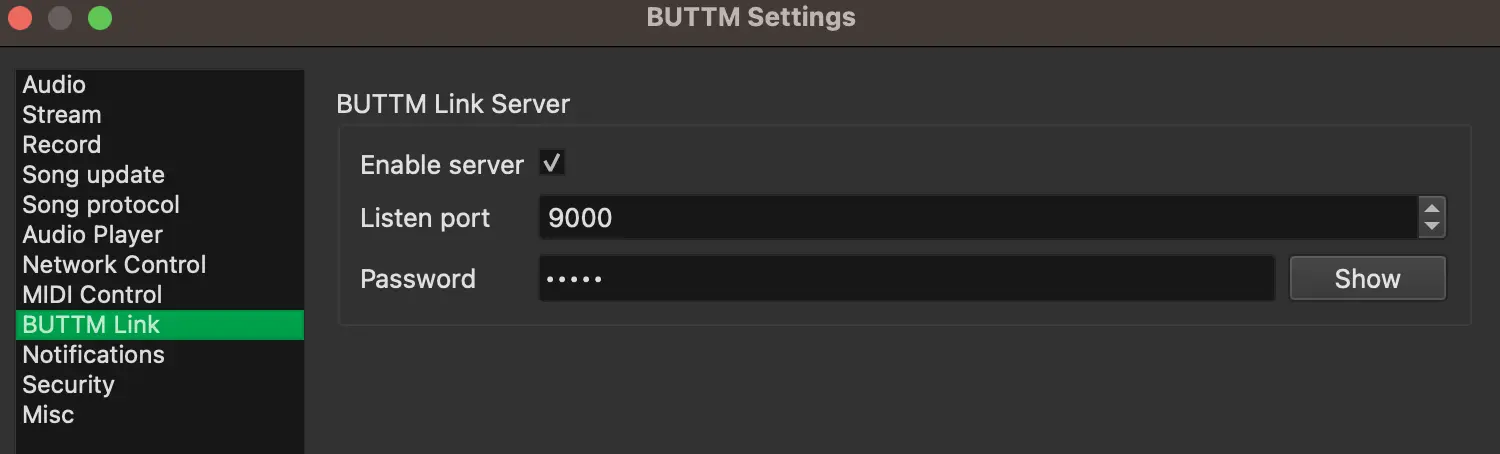
Settings: BUTTM Link
Enable Server:
When checked, BUTTM starts a BUTTM Link server and waits for an incoming connection from another BUTTM installation.
Listen port:
The network port the server listens on. The default value is 9000. If the selected port is already in use, BUTTM automatically tries the next available port.
Password:
A password that the connecting BUTTM client must provide. Click Show to reveal the password. A password is required to prevent unauthorized connections.
Info
To connect to this BUTTM Link server from another BUTTM installation, open the Server Manager on the remote BUTTM, add a new server and select BUTTM Link as the server type. Enter the IP address or hostname of this machine, the port shown above and the password.
Notifications
BUTTM can send notifications by email or call a URL when certain events occur. The sections below describe how to configure these options.
Follow these steps to send an email when a specific event happens.

Enter your mail server credentials in the Email Settings section.
The screenshot shows an example using a Gmail account. In this case the password is an API key that must be created in your Google account first.
To verify your settings, click Send Test Mail to send a test message.
Next, select the events that should send an email in the Send email when... section.
In the Email text section you can define the subject and the message body. You may use variables to customize the content.
Valid variables are: %EVENT% %STATION% %SERVER% %DATE% %TIME% %SONG%.
URL
Follow these steps to call a URL when a specific event occurs.
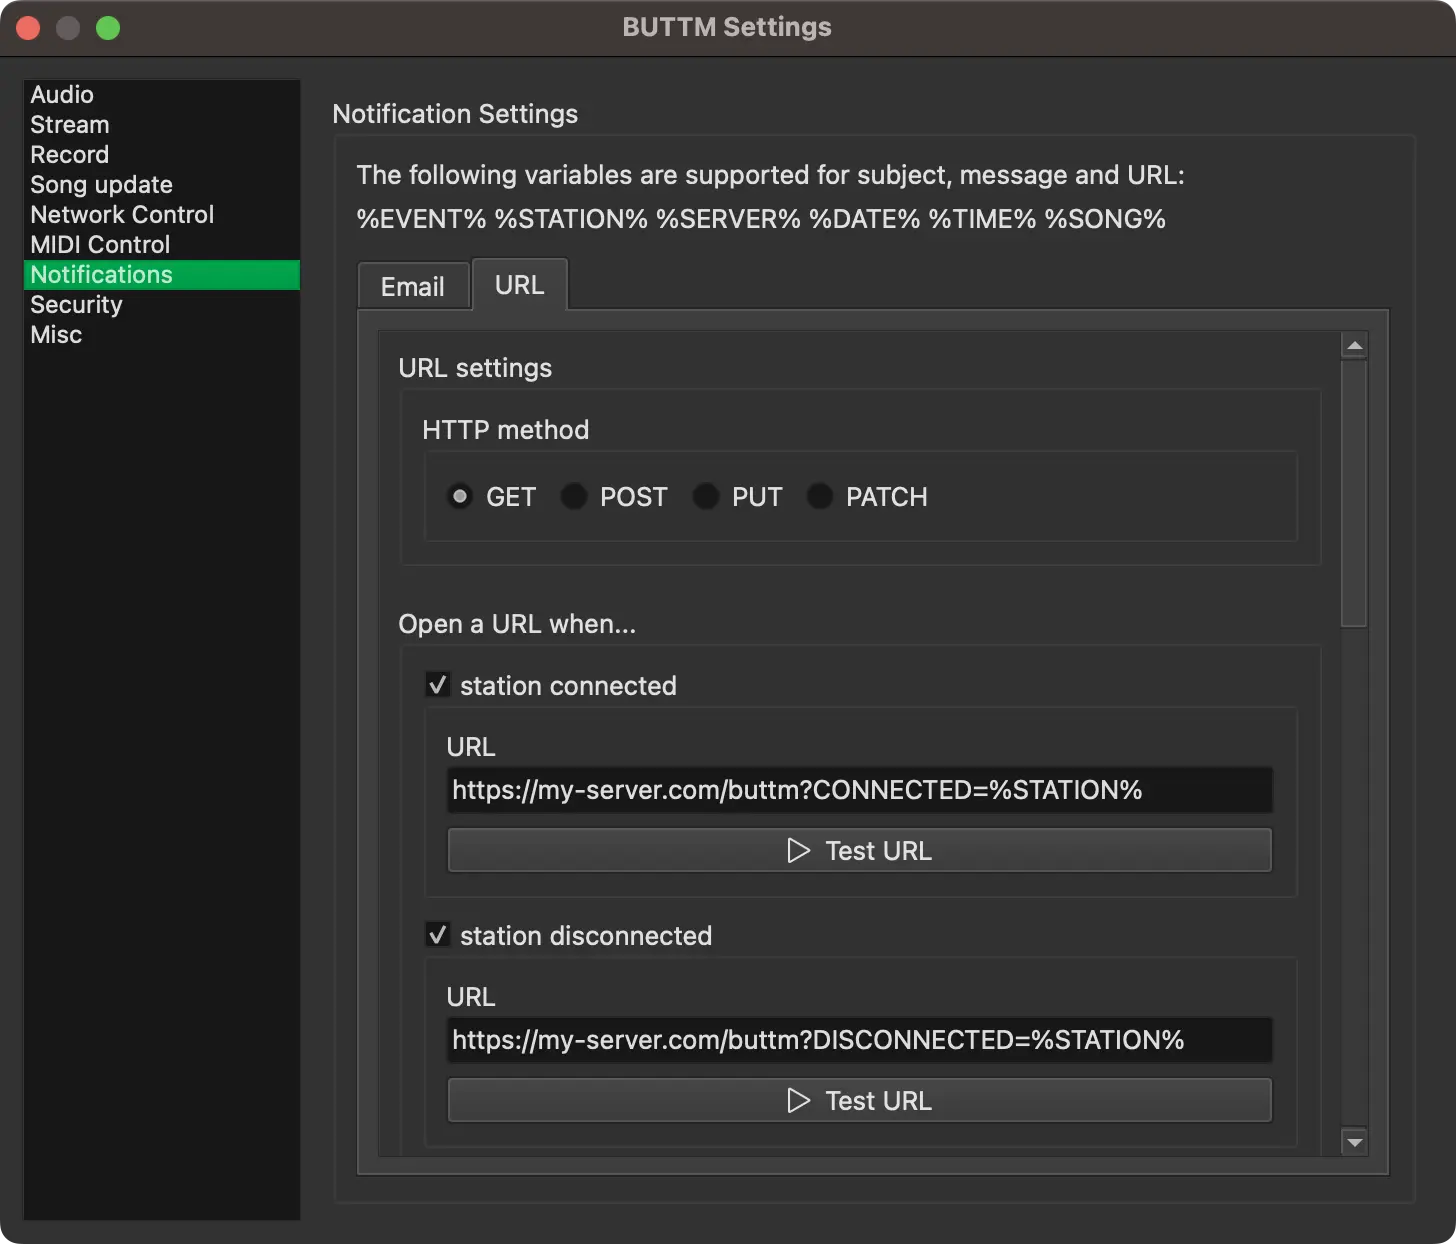
Select the HTTP method you want to use. In most cases this will be GET or POST, although PUT or PATCH may be required in some setups.
Enable each event that should trigger a URL call. After enabling an event, enter the URL and click Test URL to verify your configuration.
Security
Here you can adjust security related settings. The default configuration is secure, but you may change it if needed.
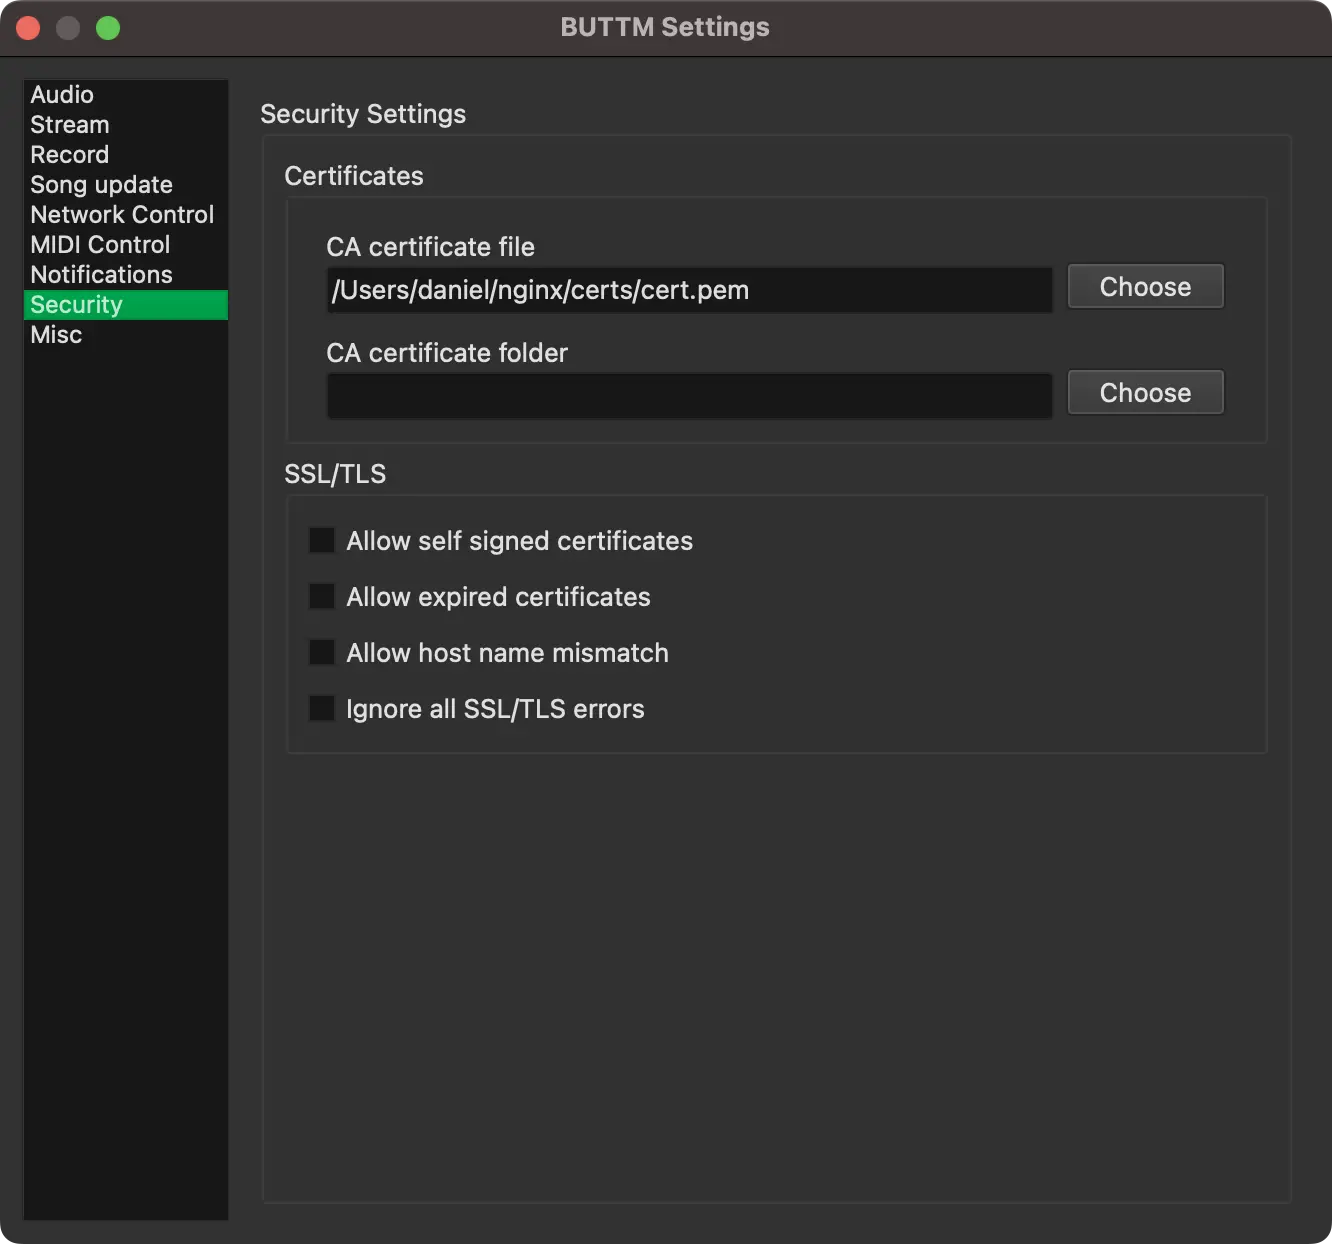
Certificates
CA certificate file:
This option allows BUTTM to load a file containing one or more trusted Certificate Authority (CA) certificates. The file is typically in PEM format.
BUTTM uses these certificates to validate SSL/TLS connections.
A self-signed certificate can also be placed here. When included, it is treated as a trusted root certificate. This is useful for internal services, development environments, or setups where a private certificate is required.
CA certificate folder:
This option points BUTTM to a directory that contains multiple individual CA certificate files.
When establishing a secure connection, BUTTM can search this directory to locate the certificate needed to verify the server's certificate chain.
SSL/TLS
Allow self-signed certificates:
Permits BUTTM to accept servers that use self-signed certificates even if they are not part of the trusted CA store.
Allow expired certificates:
Allows BUTTM to connect even when the server presents a certificate that is past its validity period.
Allow host name mismatch:
Lets BUTTM continue the connection even when the certificate's Common Name or Subject Alternative Name does not match the server's host name.
Ignore all SSL/TLS errors:
Disables all certificate validation checks. Any certificate, valid or invalid, will be accepted.
Danger
Enabling any of these options reduces connection security and may expose the application to man-in-the-middle attacks or other threats. They should only be used in controlled, non-public environments.
Password Protection
Here you can protect selected settings with a password to prevent users from accidentally changing the configuration.
Password-related settings are stored in a separate file next to the BUTTM.ini configuration file. The file is named BUTTM.pwd.
Tip
For increased security, it is recommended to set the access permissions of the BUTTM.pwd file such that a non-priviledged user may neither edit nor delete it.
On Windows the file is located at %APPDATA%/BUTTM/BUTTM.pwd
On macOS the file is located at ~/.config/BUTTM/BUTTM.pwd
Misc
This section contains settings that do not belong to any of the other categories.
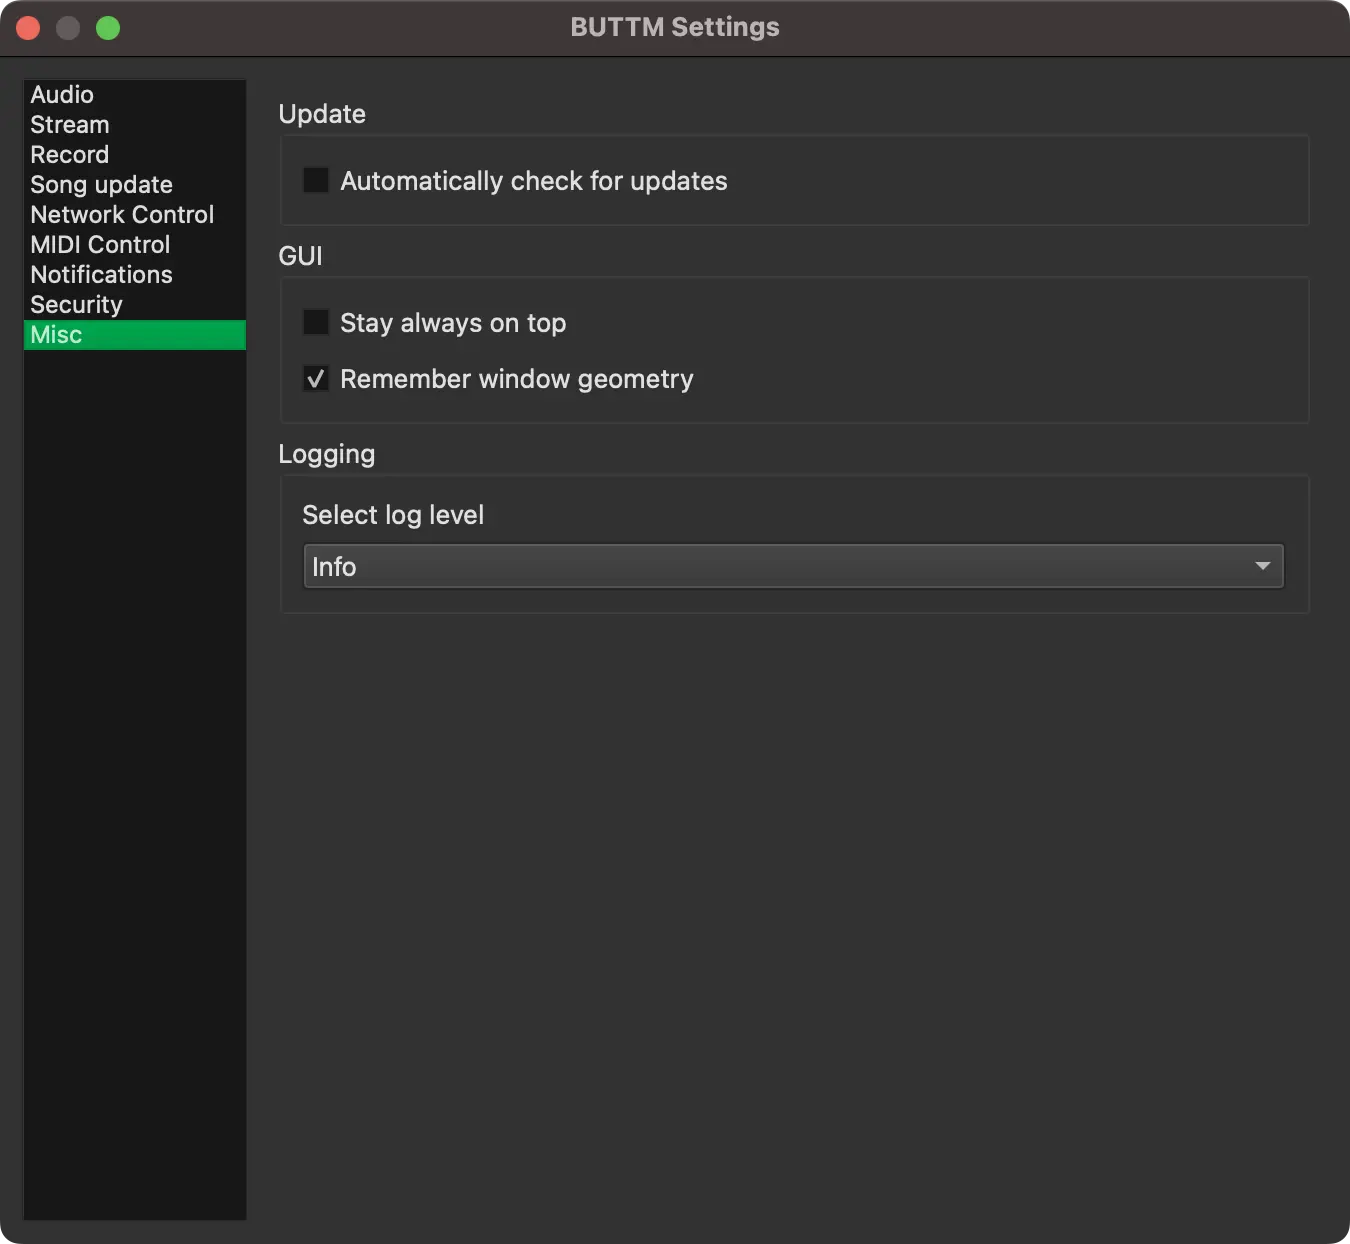
Update
Automatically check for updates:
Enable this to let BUTTM check for updates when the application starts.
GUI
Stay always on top:
Enable this if you want the main BUTTM window to remain in the foreground.
Remember window geometry:
Enable this if you want BUTTM to remember the window position and size across restarts.
Confirm before closing:
When enabled, BUTTM always asks for confirmation before closing, even when no stream or recording is active. By default BUTTM only asks for confirmation when a broadcast or recording is running.
UI Scale:
Use Scale to resize BUTTM so it fits your desk setup perfectly.
Custom Window Title: Here you can enter a custom window title for the main window.
Logging
Set log level:
Select the desired log level. Debug is the most detailed level, while Critical logs only essential information.
Tip
When reporting a problem, please set the log level to Debug and attach the exported log file to your report.
To export the log file, choose File → Export log file.
Uninstall
Windows
To uninstall BUTTM open your Windows Control Panel and click on Uninstall a program.
Control Panel
Now right click on the BUTTM line in the list of installed applications and select uninstall.
Programs list
If you also want to remove the configuration file, simply confirm the option during the uninstallation process.
If you want to remove the configuration file manually go to %APPDATA%/BUTTM in your Windows Explorer and delete the file BUTTM.ini.
Windows Config Path
macOS
To uninstall simply delete BUTTM.app from the Applications folder.
To delete the configuration file open a Terminal and enter:
rm ~/.config/BUTTM/BUTTM.ini
To delete the log file run:
rm ~/Library/Logs/BUTTM/BUTTM.log